The Ultimate Guide to Setting Up a Blog on Shopify
Setting up a blog on your Shopify store can be a game changer, especially for new eCommerce stores struggling to rank on Google and other search engines. As I’m writing this in 2025, competition in almost every niche is tougher than ever. Getting your website in front of potential customers is no easy task.
However, ranking organically on Google and other search engines is absolutely possible—with the right SEO strategies and a solid content marketing plan. While social media marketing also plays a crucial role, we won’t be diving deep into that today. Instead, this guide is all about setting up a blog on your Shopify store like a pro to boost your organic reach.
But before we get into the technical steps, let’s talk about something important—why you absolutely need a blog on your eCommerce store.
Why You Must Have a Blog on Your eCommerce Store
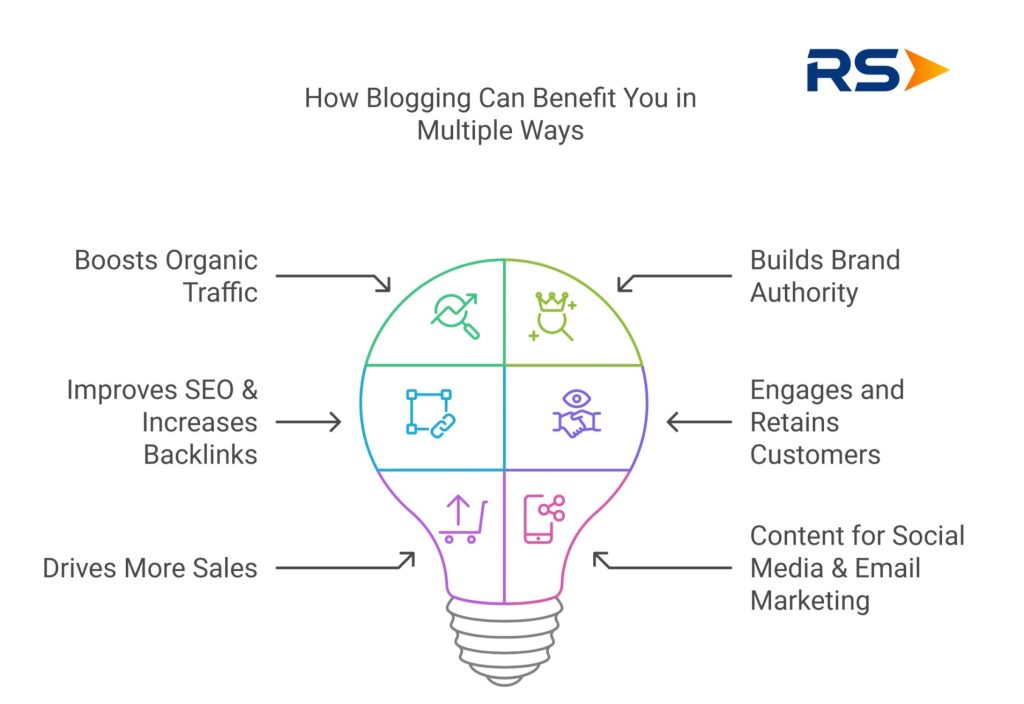
Many online store owners underestimate the power of blogging, assuming that eCommerce is all about product listings and paid ads. But the reality is, a well-maintained blog can significantly improve your store’s visibility, credibility, and customer engagement. Here’s why:
1. Boosts Organic Traffic
Search engines love fresh, high-quality content. By consistently publishing blog posts related to your products and industry, you increase your chances of ranking for relevant keywords. This means more potential customers can discover your store without you having to spend a dime on ads.
2. Builds Brand Authority
People trust brands that educate and provide value. When you share useful content—like how-to guides, product comparisons, or industry insights—you position yourself as an expert in your niche. This builds trust, making customers more likely to choose you over competitors.
3. Improves SEO & Increases Backlinks
Google prioritizes websites with valuable content. Well-written blog posts attract backlinks (other websites linking to your content), which boosts your site’s domain authority and helps it rank higher in search results. Plus, internal linking within your blogs can help improve navigation and SEO.
4. Engages and Retains Customers
A blog isn’t just for attracting new visitors—it also keeps existing customers engaged. Whether it’s sharing tips on how to use your products, industry news, or customer success stories, a blog helps maintain an ongoing relationship with your audience.
5. Drives More Sales (Without Being Pushy)
Unlike direct sales pages, blogs allow you to promote your products naturally. For example, a blog post about “The Best Winter Skincare Routine” can seamlessly include links to your skincare products, making it easier for readers to shop without feeling pressured.
6. Gives You Content for Social Media & Email Marketing
Struggling with what to post on social media or in your email newsletters? Your blog content can be repurposed into Instagram posts, Pinterest pins, LinkedIn articles, or even email campaigns—saving you time while keeping your audience engaged across platforms.
Now that you understand why having a blog on your eCommerce store is essential, let’s dive into the step-by-step process of setting it up on Shopify.
Create Your First Blog Post on Shopify
To start publishing a blog post on your Shopify store, head over to your Shopify dashboard, click on Content, and then select Blog Posts. This will take you to the blog management section, where you can create and manage all your posts.
Check the screenshot below for a visual guide to help you through the process:
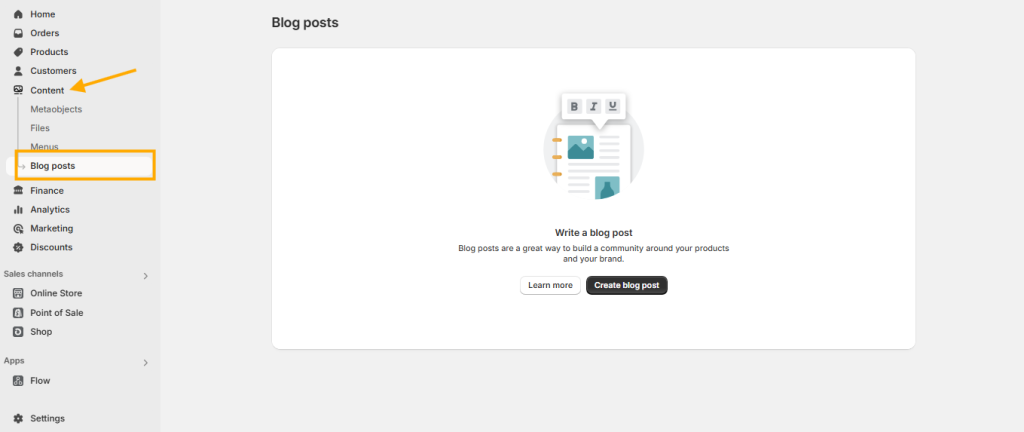
On the Blog Posts page, you’ll see a list of all your published blog posts. However, if you haven’t created any posts yet, Shopify will display two call-to-action (CTA) buttons:
- Learn More – This button redirects you to Shopify’s help page, where you can find a detailed guide on how blog posts work.
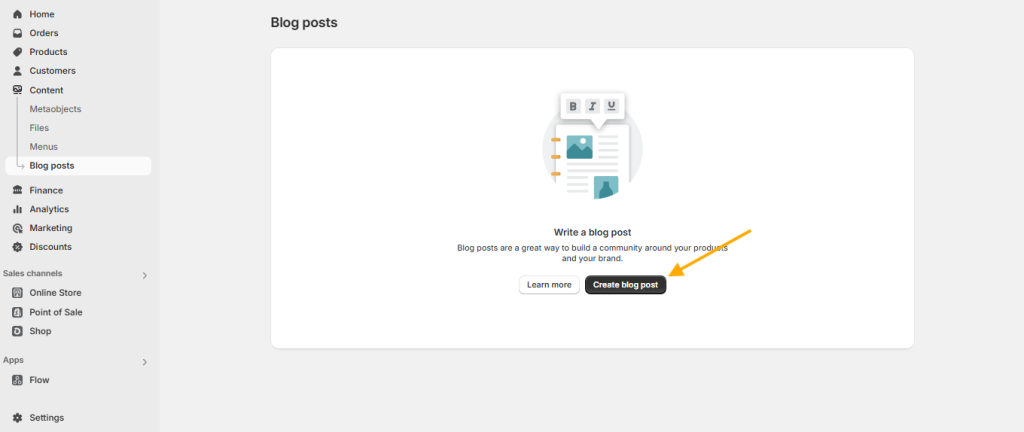
- Create Blog Post – Clicking this button will allow you to start writing your first blog post for your store.
To get started, I’ll click on the Create Blog Post button so we can begin crafting our first post. Check the screenshot below for a visual guide:
Now that we’re on the Blog Post Editor page, you’ll see all the essential options needed to create and publish your blog post. To make things easier, let’s go through each section step by step so you can understand how everything works.
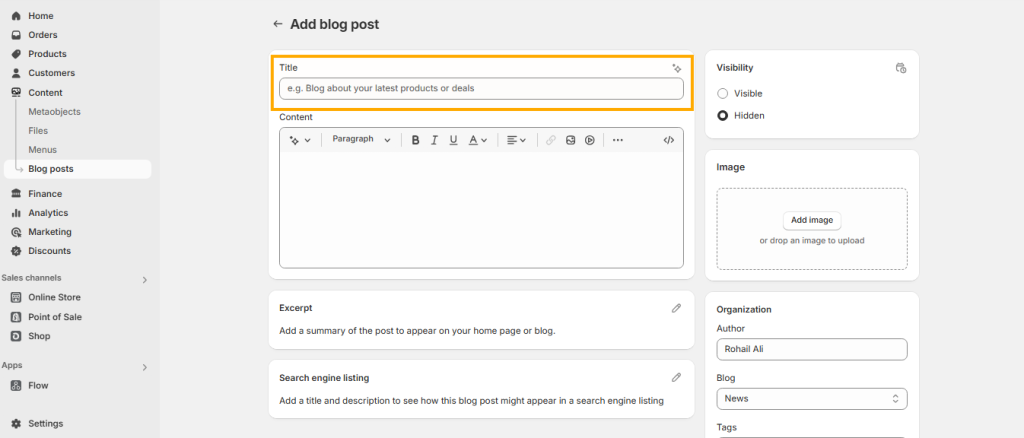
The first option you’ll notice is the Title Field, where you can add the title of your blog post. This is crucial because a well-crafted title helps attract readers and improves your SEO.
Check the screenshot below for a visual guide:
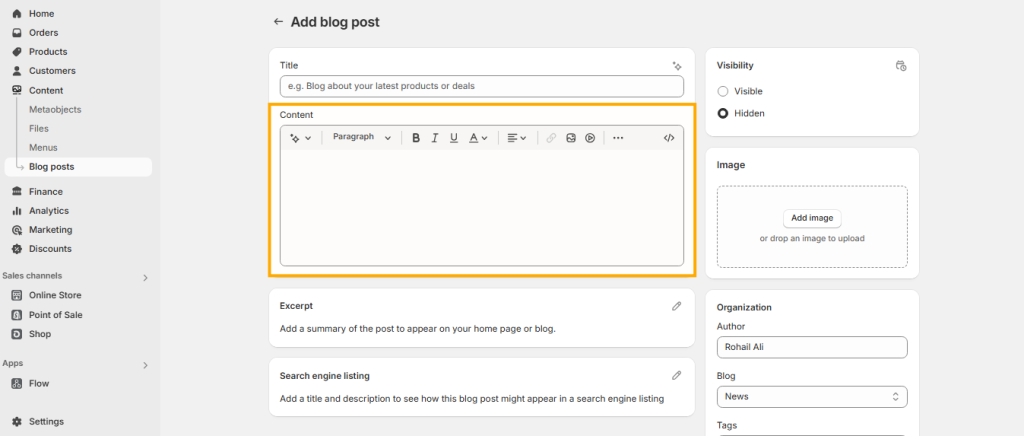
The next section is called the Content field. This is where you can add text, embed videos, and format your content to make it visually appealing. However, the default Shopify blog editor has some limitations—you won’t be able to use your theme’s pre-built blocks directly.
If you want to design a blog post using the Theme Editor, you’ll need to create a custom blog post template first. Once the template is ready, you can assign it to your blog post. Using the theme editor for blog design allows you to incorporate various theme blocks, such as product showcases, sliders, customer reviews, and other dynamic elements to make your blog post look more professional and engaging.
Later in this guide, I’ll walk you through the process of creating a custom blog post template and assigning it to your blog posts, so stay tuned!
Check the screenshot below to see where you can add and format text content in the blog post editor:
Blog Excerpt and SEO Settings
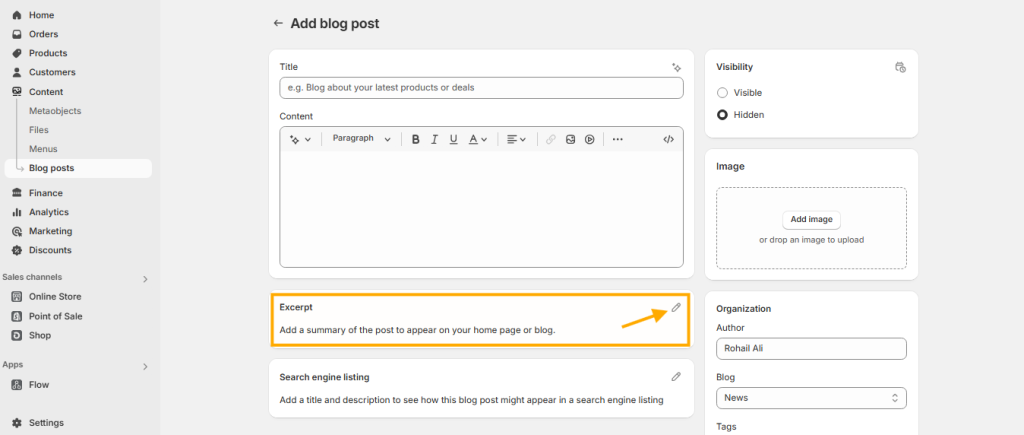
The next section is the Excerpt, which you can add by clicking the edit icon. A blog excerpt is a short summary or preview of your blog post. It helps readers get a quick idea of what the article is about before they click to read more. Shopify uses this excerpt in different places, such as the blog listing page, email previews, or even search results within your store. Writing a compelling excerpt can increase engagement by enticing visitors to read the full post.
Check the screenshot below for a visual guide:
Search Engine Listing Preview
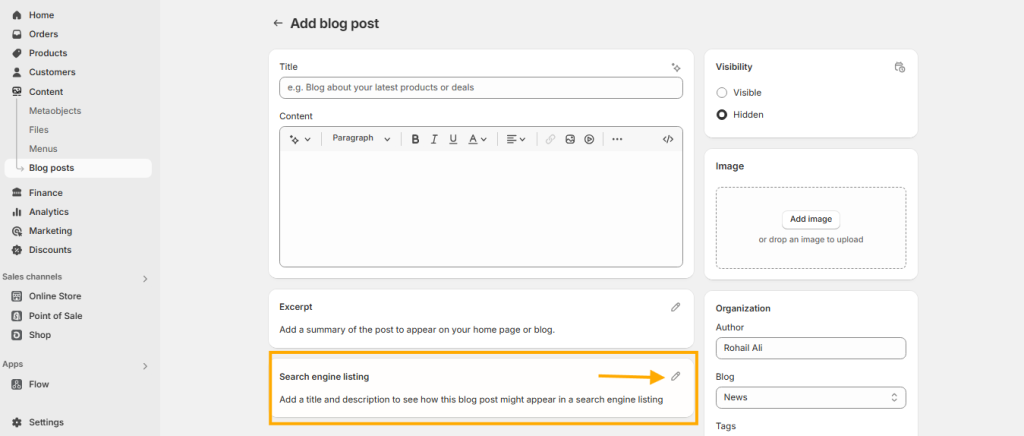
Right below the Excerpt section, you’ll find the Search Engine Listing section. This is where you can optimize your blog post for SEO by adding:
- Meta Title – This is the title that appears in search engine results. It should be catchy and include relevant keywords.
- Meta Description – A short summary (around 150–160 characters) that describes your blog post in a way that encourages users to click.
- URL Handle – You can customize the URL of your blog post to make it more SEO-friendly and readable.
You can edit these SEO settings by clicking the Edit icon on the right side of the section. Optimizing these fields helps improve your blog’s visibility on search engines like Google, making it easier for potential customers to discover your content.
Check the screenshot below for a visual guide:
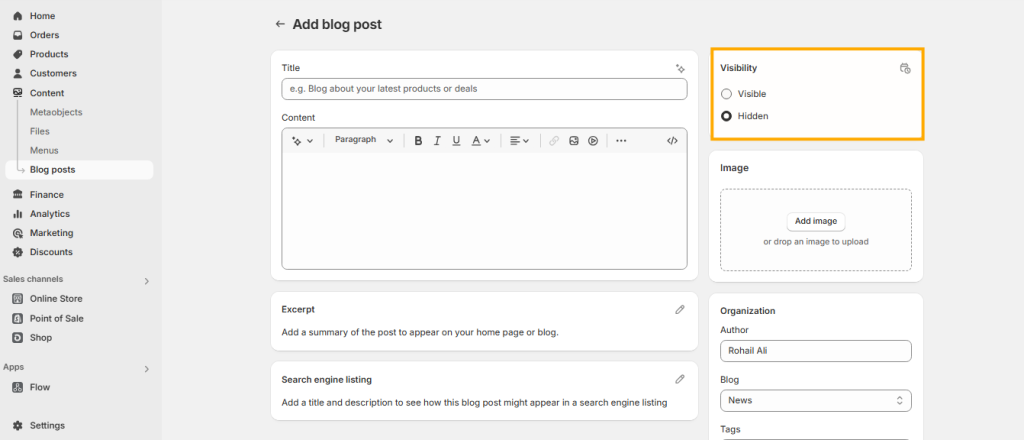
Visibility Section:
The Visibility section determines whether your blog post is published or kept as a draft. It consists of two options:
- Visible – Selecting this option will publish your blog post, making it live on your store for visitors to see.
- Hidden – This is the default option. If selected, the blog post remains in draft mode and will not be visible on your storefront until you choose to publish it.
- Visibility Date – This option allows you to schedule a specific date and time for your blog post to be published automatically. It’s useful if you want to plan content ahead of time or align posts with marketing campaigns.
Make sure to check this setting before finalizing your post. If you’re still working on your content or need approval before publishing, you can keep it hidden until you’re ready.
Please refer to the screenshot below for visual guidance:
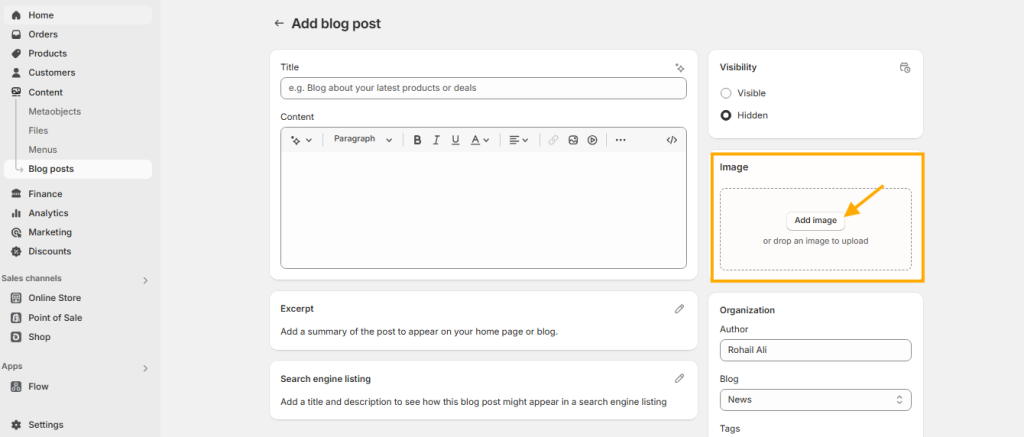
Adding a Featured Image
The next option is the Image section, where you can upload a featured image for your blog post. Simply click on the Add Image button to upload an image that best represents your content.
For the best results, use a square image with dimensions like 1500px x 1500px or 2000px x 2000px to ensure it looks sharp and professional on all devices.
Please check the screenshot below for visual guidance:
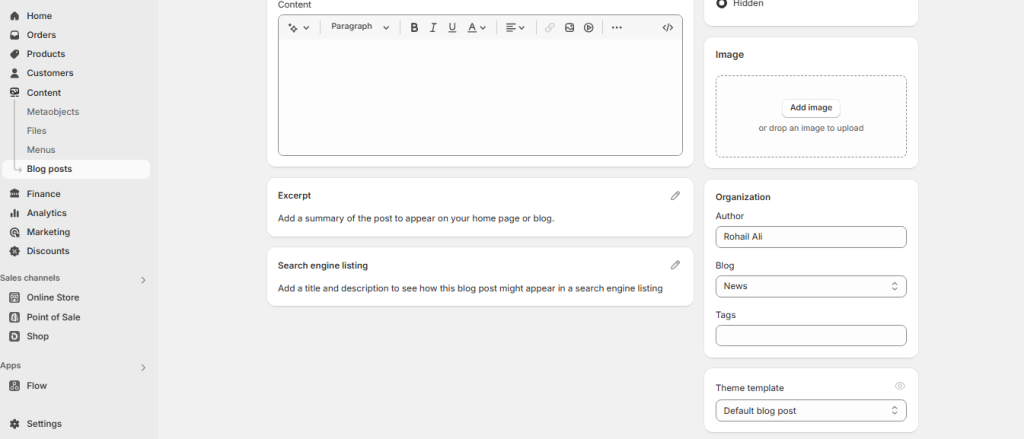
Organization Section
The next section is the Organization section, which includes the following options:
- Author Name: This field displays the name of the person writing the blog post.
- Blog: Here, you can select an existing blog category for your post or create a new one.
- Tag Field: Use this field to add relevant tags to your blog post, making it easier for readers to find related content.
Please check the screenshot below for visual guidance:
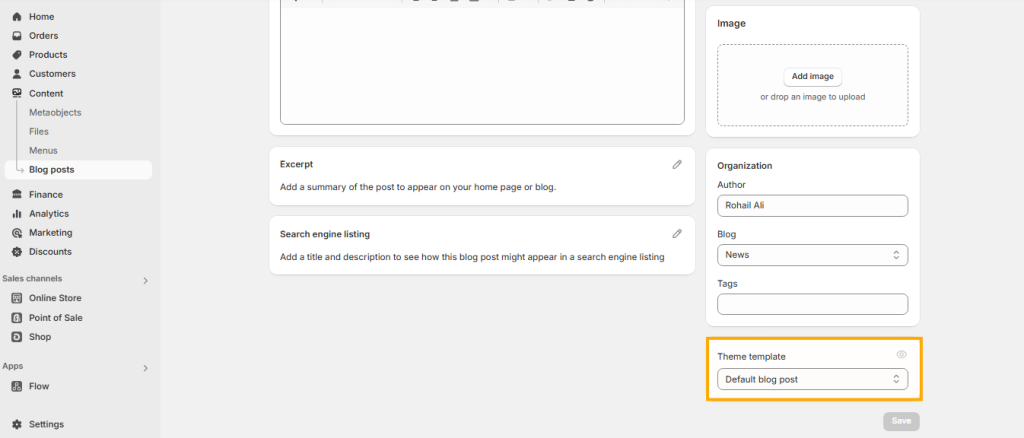
Theme Template Section
The final section on the blog post editor page is the Theme Template section. By default, you’ll see a single blog post template created by the theme developers, labeled “Default Blog Post.”
As we discussed earlier, Shopify’s default blog post editor allows you to add text, images, and videos, and format your content. However, it does not support theme blocks such as full-width sliders, review sections, featured product sections, collection lists, and other advanced design elements.
But don’t worry! We’ll walk you through the process of creating a custom blog post template using the Theme Editor and show you how to assign it to your blog posts. This will allow you to design your blog with the same flexibility as the rest of your Shopify store.
Check out the screenshot below for a visual guide to the Theme Template section:
Creating a Custom Blog Post Template
Now that we’ve covered all the options available in Shopify’s default blog post editor, let’s move on to creating a custom blog post template using the Theme Editor. This will allow you to add theme blocks, giving your blog posts a more professional and dynamic look.
How to Create a Blog Post Template in Shopify
To get started, follow these simple steps:
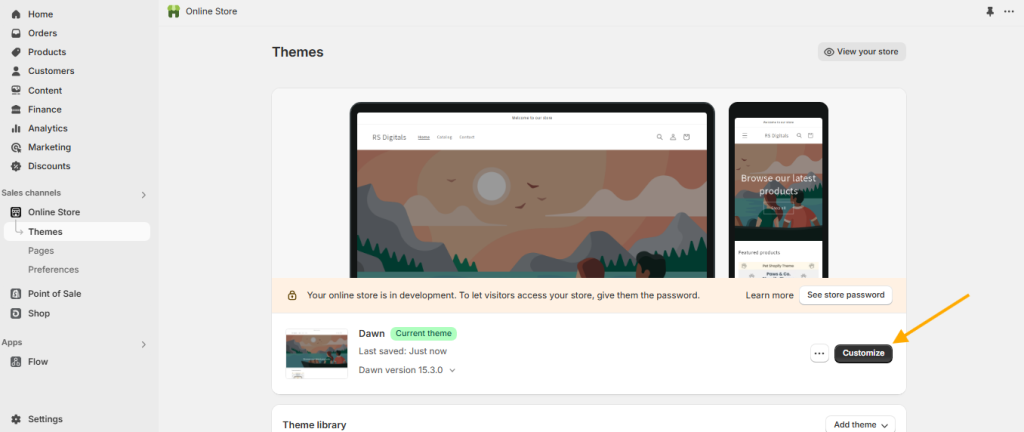
- From your Shopify dashboard, navigate to Online Store > Themes.
- Click the Customize button to open the Theme Editor.
Once inside the Theme Editor, we’ll create a custom template that allows you to add theme blocks like sliders, featured products, reviews, and more.
Check out the screenshot below for a visual guide:
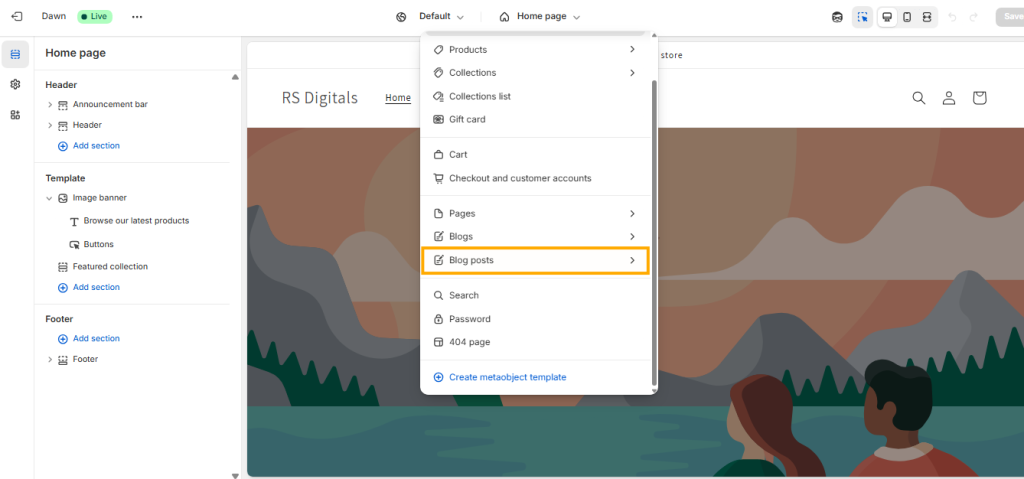
Once you’re in the Theme Editor, click on the top dropdown menu and select Blog Posts from the list.
This will allow you to create and customize a blog post template using theme blocks.
Check out the screenshot below for a visual guide:
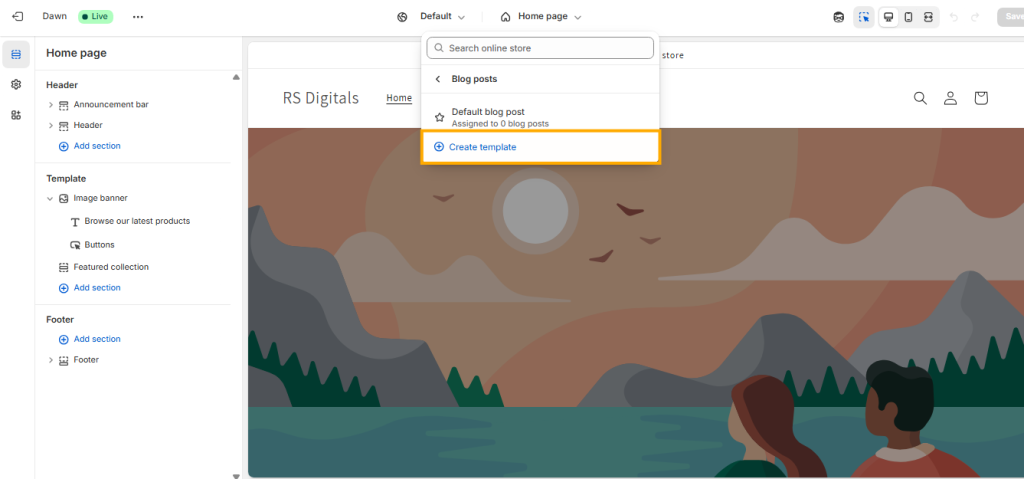
After selecting Blog Posts from the dropdown menu, click on Create Template, as shown in the screenshot below:
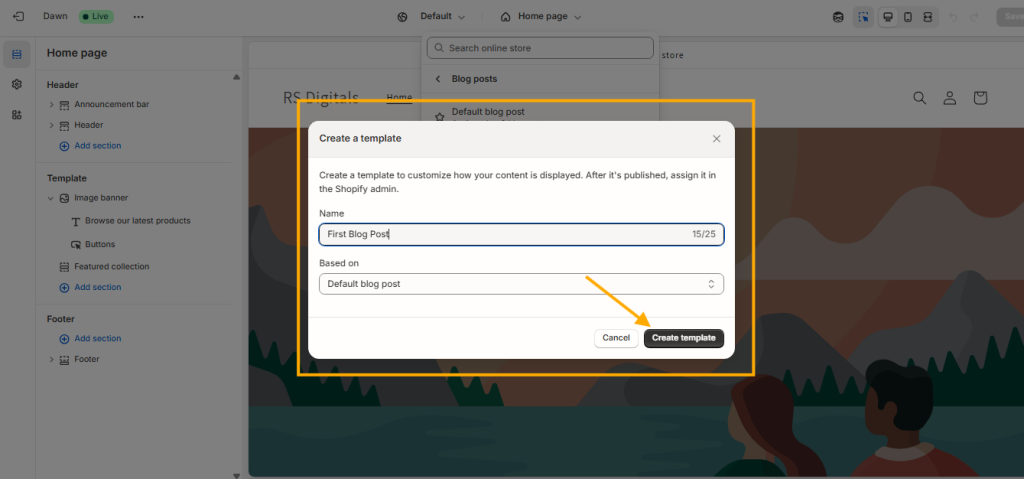
After clicking on Create Template, a pop-up will appear with two options:
- Name – Here, you can enter a name for your template. This name will appear in the default blog post editor, so make sure to give it a unique and recognizable name.
- Based on – This dropdown allows you to select an existing blog post template to duplicate its style. If you’re creating your first blog post template, the Default Blog Post template will be selected automatically.
As you can see in the screenshot, I named my template “First Blog Post”, and under the Based on option, I selected Default Blog Post since my theme doesn’t have any other blog post templates.
Once you’ve filled in the details, click on Create Template to proceed.
Please refer to the screenshot below for visual guidance:
Now that we’ve created a blog post template, let’s assign it to a new blog post.
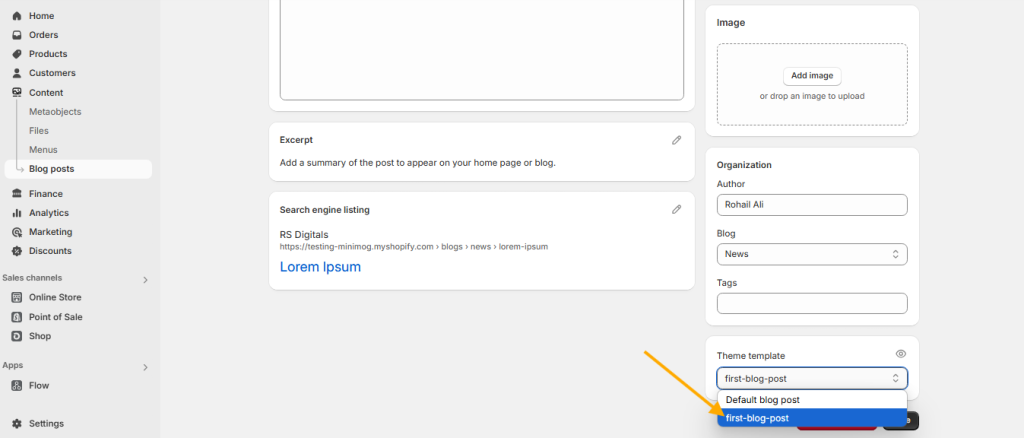
To do this, open the default blog post editor using the same steps we discussed earlier. Then, navigate to the Theme Template section, click on the dropdown, and select the template you want to assign to the blog post.
In our case, we created a template named “First Blog Post”, so I’ll select that template for this blog post.
Please refer to the screenshot below for visual guidance:
Now that you know how to create custom blog post templates using the theme editor and are familiar with the default blog post editor’s features, you’re well on your way to optimizing your Shopify blog.
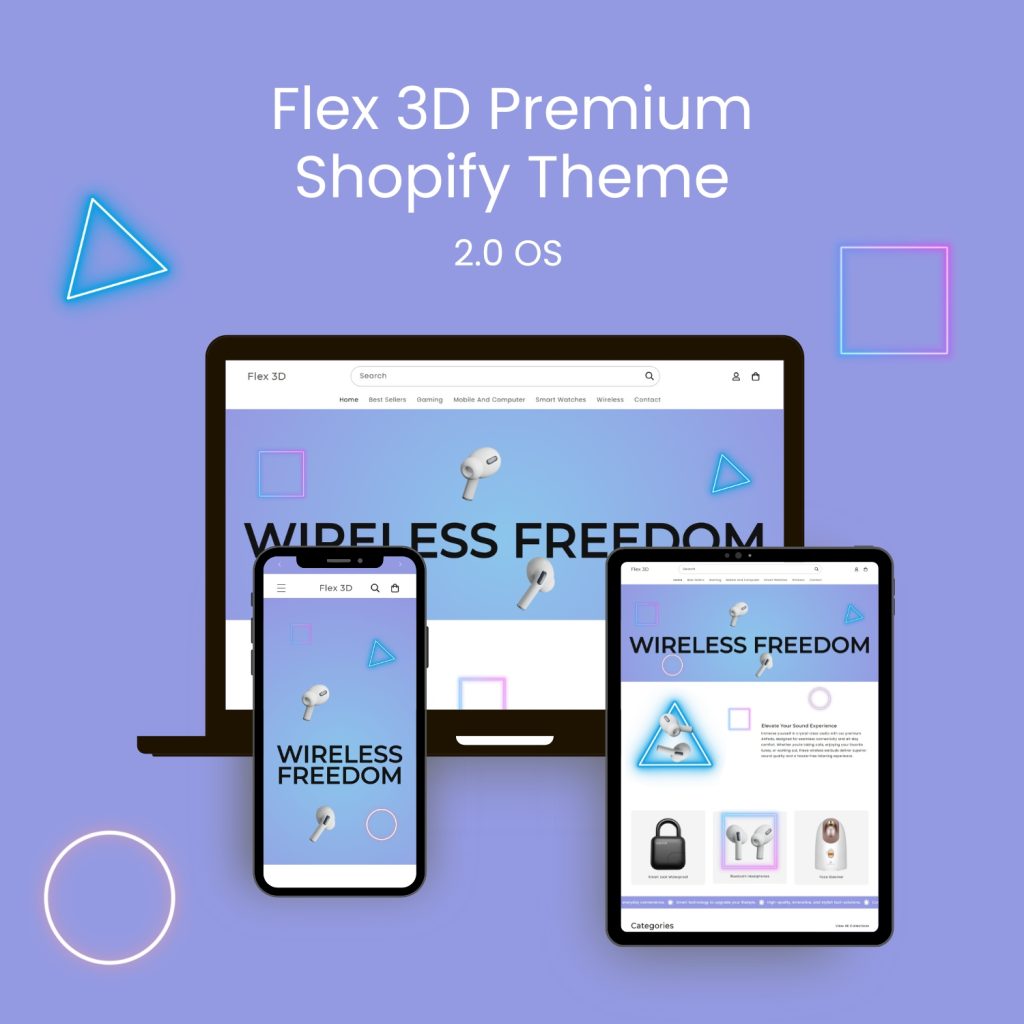
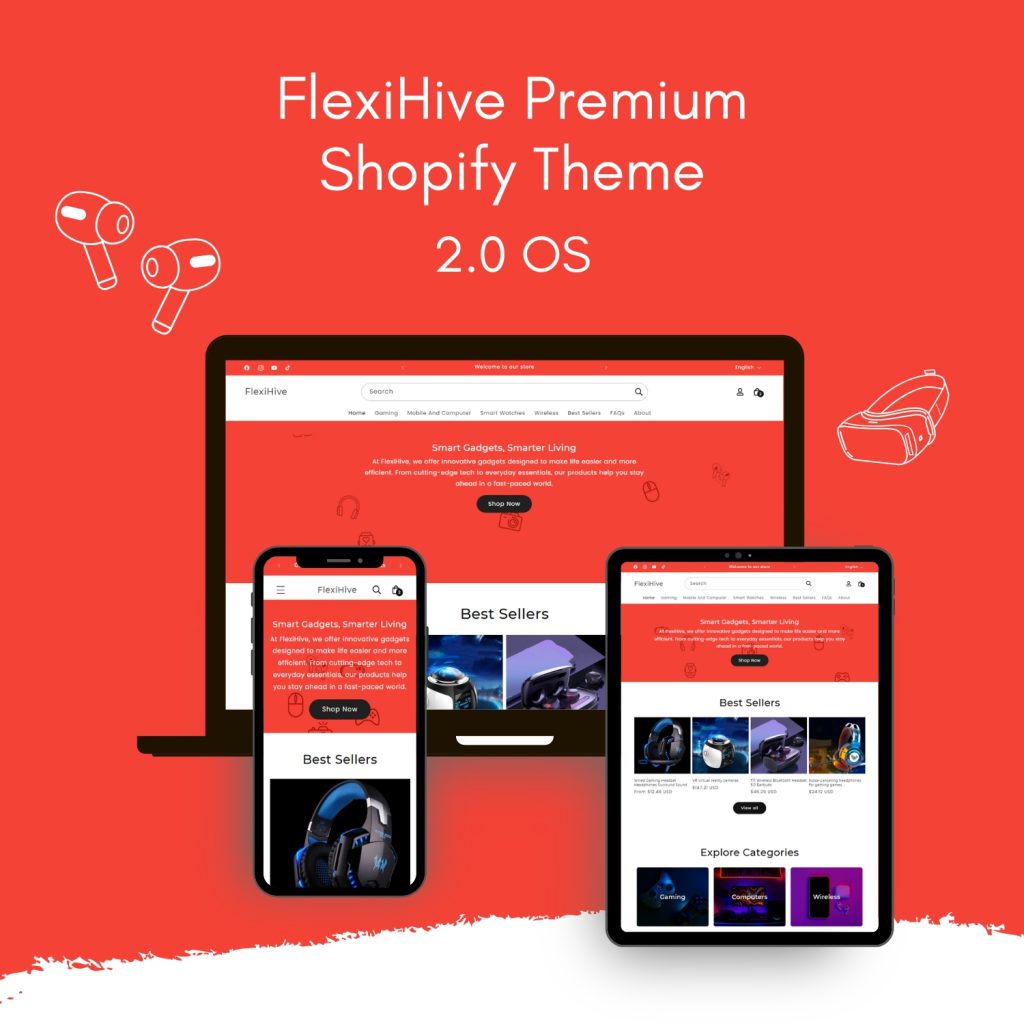
One important thing to keep in mind is that if you’re using a free Shopify theme, you may have limited pre-built theme blocks to design your store and blog posts. The best solution? Upgrade to a premium Shopify theme from RS Digitals—not only are they mobile-friendly and SEO-optimized, but they also come with six months of free technical support to help you get the most out of your store.
Explore RS Digitals’ Premium Shopify Themes:

Conclusion
Setting up a blog on Shopify is a game-changer for driving organic traffic and boosting your store’s visibility. By following this guide, you now know how to create and customize blog posts, optimize them for SEO, and even design custom templates to enhance your content. Whether you’re using Shopify’s default editor or upgrading to a premium theme, blogging can help establish your brand, attract customers, and improve your search rankings.
If you’re looking for a more feature-rich design, RS Digitals’ premium Shopify themes offer enhanced customization options and six months of free support. Start optimizing your blog today and watch your eCommerce store grow!
