How to Set Up Shipping in Shopify (2025 Guide)

Shipping is one of the most crucial parts of running an online store. It’s not just about getting products from point A to point B—it’s also about providing a seamless, reliable experience for your customers. With Shopify, setting up your shipping options is straightforward, but there are various ways to tailor it to your business needs. Whether you’re offering flat-rate shipping, calculating costs by weight, or integrating with major couriers, this guide will walk you through everything you need to know.
What is Shipping in Shopify?
In Shopify, shipping refers to the process of configuring how your products are delivered to customers. This includes setting up shipping rates, choosing carriers, and determining how shipping costs are calculated at checkout. Shopify gives you the flexibility to offer different shipping methods, whether you’re handling deliveries yourself or working with third-party carriers.
Types of Shipping Options You Can Set Up in Shopify
Flat-Rate Shipping:
Flat-rate shipping means you charge a fixed fee for shipping, regardless of the order size or destination. This is great for simplifying the checkout process and giving customers predictable costs. For example, you might charge $5 for all domestic orders.
Weight-Based Shipping:
With weight-based shipping, the cost is determined by the total weight of the order. Shopify lets you create different weight ranges and assign corresponding shipping rates. This option is perfect if you’re selling products with varying sizes and weights.
Carrier-Calculated Shipping (Courier Services):
If you want real-time shipping rates from major couriers like UPS, FedEx, or USPS, Shopify allows you to integrate these services. This way, your customers will see accurate shipping costs based on their location and the package details.
Watch the Video for a Step-by-Step Walkthrough:
I’ve made a video tutorial where I walk you through the process of setting up flat-rate shipping and weight-based shipping on your Shopify store. If you prefer a visual guide (or just don’t feel like reading the entire article), make sure to check it out! It’s perfect if you want to follow along step by step:
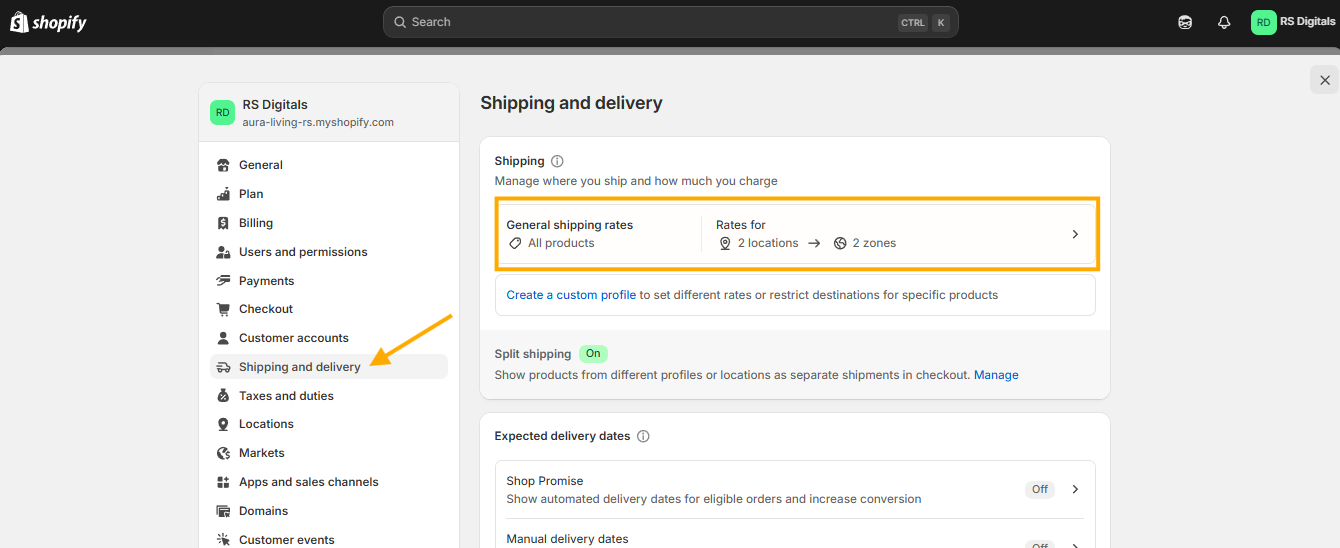
Step 1: Open the Shipping and Delivery Page:
To get started with setting up flat-rate or weight-based shipping, you’ll first need to know where to configure these options in Shopify. All shipping settings are managed from the Shipping and Delivery page. Here’s how to find it:
- From your Shopify dashboard, click on Settings in the bottom-left corner.
- Select Shipping and Delivery from the settings menu.
- Under the Shipping section, click on General Shipping Rates to adjust your shipping settings.
This is where you can set up various shipping methods, including flat-rate and weight-based shipping. Check out the screenshot below for a visual walkthrough:
Step 2: Set Up Flat Rate Shipping:
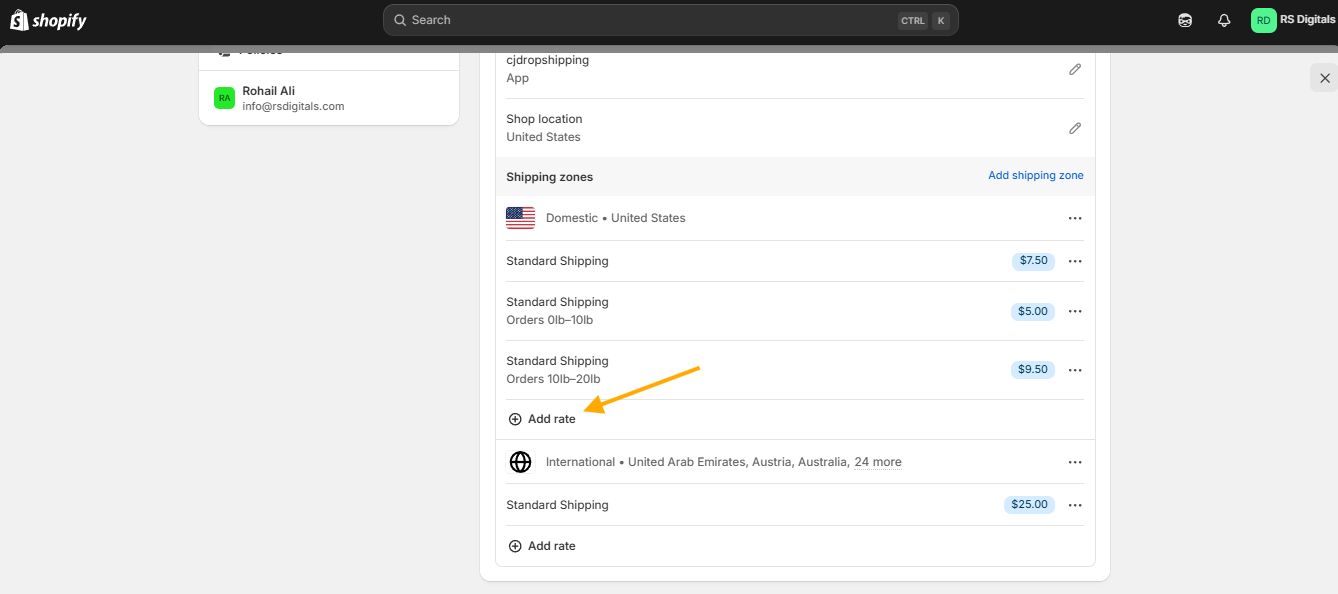
Once you’re on the General Shipping Rates page, you’ll notice two zones: Domestic and International.
- The Domestic zone includes the country you selected when setting up your Shopify store.
- The International zone lets you add or remove countries where you want to sell and ship your products.
Setting up shipping rates for both zones follows the same process. In this guide, we’ll focus on setting up flat rate & weight-based shipping for the Domestic zone, but you can apply the same steps for the International zone. You can also create custom zones for specific countries, but diving into that would require a separate article.
To get started with flat rate shipping, click the + Add Rate button under the Domestic zone.
Refer to the screenshot below for visual guidance!
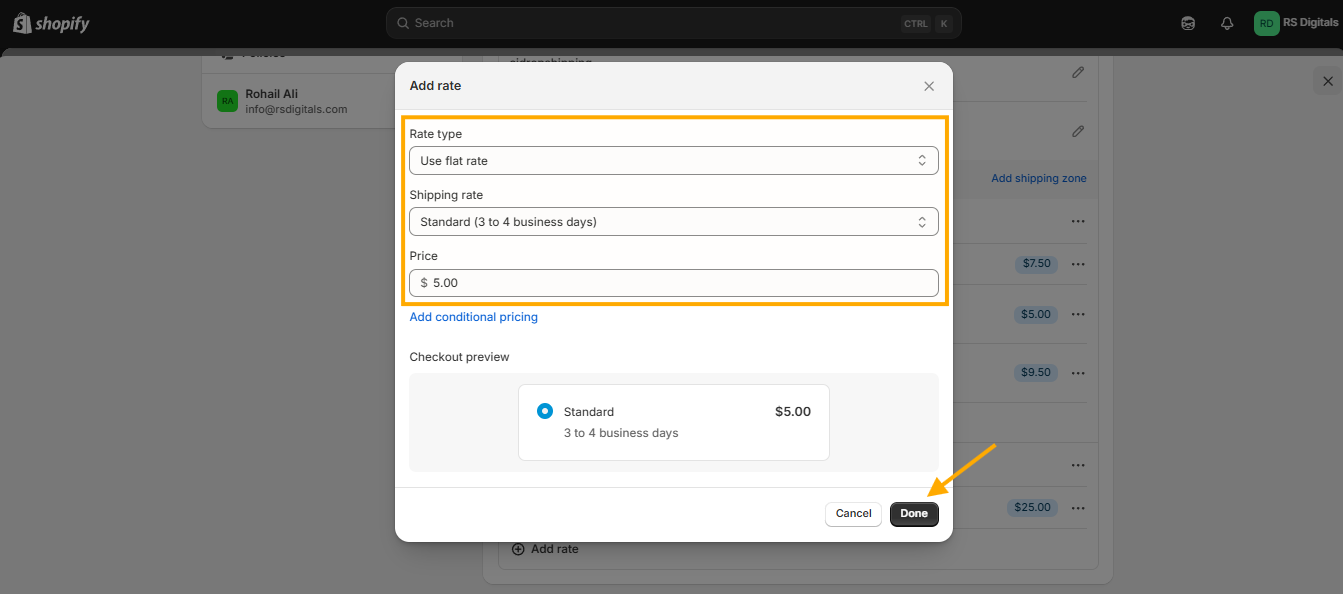
A pop-up will appear with all the options you need to set up flat rate shipping. Here’s what you’ll see:
Rate Type Dropdown:
Since we’re setting up flat rate shipping, select “Use flat rate” from the dropdown menu.
Shipping Rate:
In this field, you’ll find several predefined options, plus a custom option where you can give your rate a unique name. To keep it simple, I’m selecting “Standard (3 to 4 business days)” from the dropdown, but feel free to customize it to fit your needs.
Price Field:
Here’s where you’ll enter the flat rate for your shipping. For this guide, I’m setting it at $5, but you can input any amount that works for your business.
Once you’ve filled out all the details, click the “Done” button to add this rate to your shipping zone.
Check out the screenshot below to see how it looks in action:
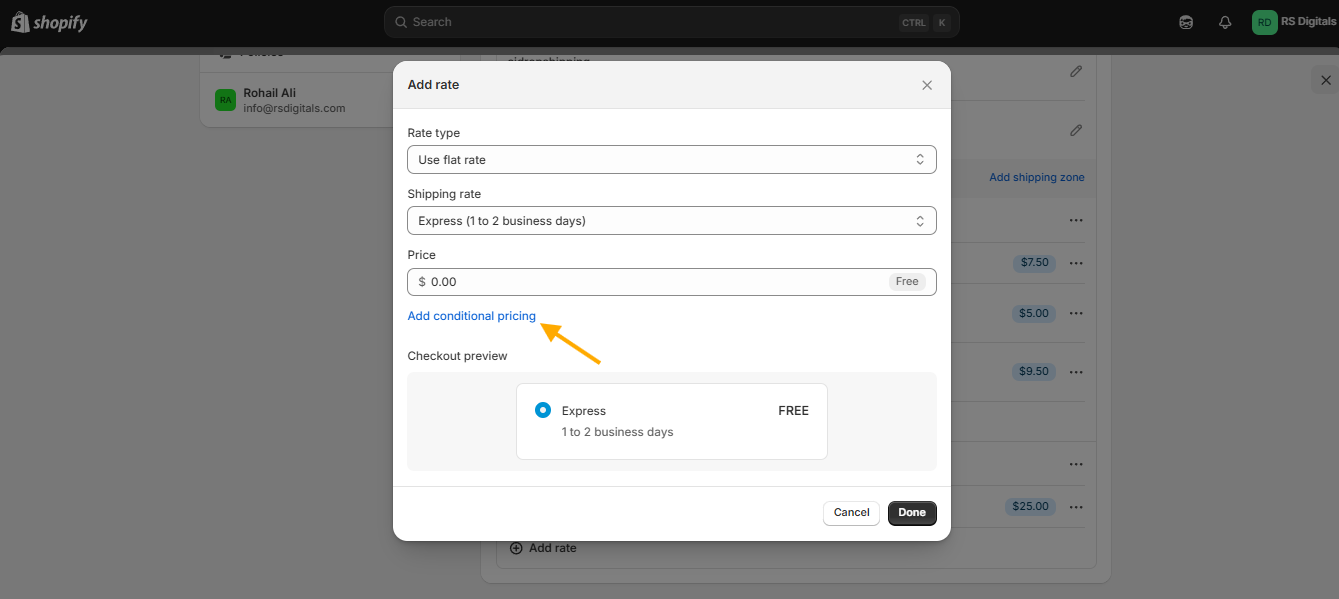
Step 3: Set Up Weight-Based Shipping:
To set up weight-based shipping, click on the “+ Add Rate” button, as previously described. In the pop-up window, you’ll see similar options to those used for flat rate shipping.
- For the Rate Type dropdown, select “Use Flat Rate.”
- Choose an option from the Shipping Rate dropdown, or create a custom name.
- Enter your desired shipping price in the Price field.
While we’ve already covered these steps, the key difference for weight-based shipping is clicking on the “Add Conditional Pricing” link. This allows you to set shipping rates based on the weight of the order.
Refer to the screenshot below for visual guidance:
Setting Up Shipping Conditions:
You’ll see two condition options:
- Based on Item Weight – This allows you to set shipping rates based on the total weight of the order. Perfect if your shipping costs vary with heavier items.
- Based on Order Price – This lets you adjust shipping rates based on the total price of the order. It’s great for offering incentives like free shipping on orders over a certain amount. For example, many stores offer free shipping on orders over $100, and you can easily set that up using this condition.
For this guide, we’re focusing on weight-based shipping, so I’ll select the “Based on Item Weight” option.
Next, in the Minimum field, enter the starting weight (e.g., 0 pounds). In the Maximum field, set the upper limit (e.g., 5 pounds). Finally, in the Price field, enter the shipping cost for this range—I’m setting it at $5 for this example.
Check out the screenshot below to see how the final setup looks:
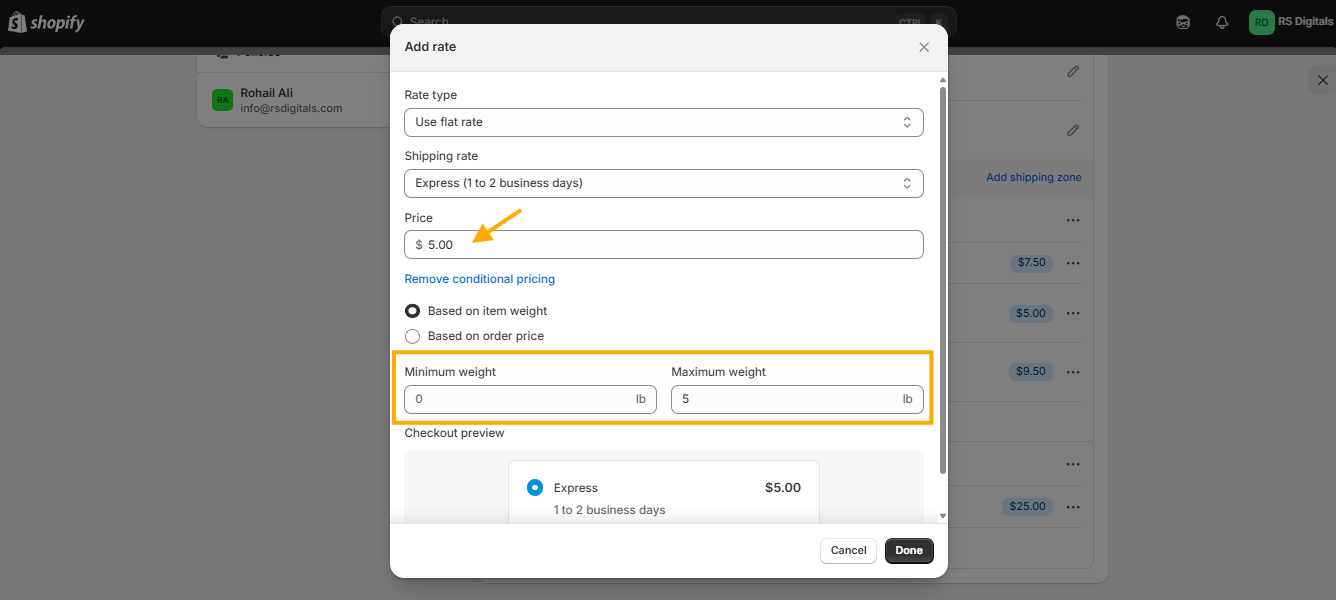
And that’s how you set up weight-based shipping in Shopify! In the screenshot above, you’ll see that Shopify will charge $5 when a customer’s total order weight falls between 0 to 5 pounds.
If you’d like to add another weight-based shipping condition, just make sure to start the minimum weight at 5 pounds. This ensures Shopify only displays one shipping rate per order, keeping things simple and seamless for your customers.
I’ve covered this in more detail in the video above, so feel free to check it out for a clearer walkthrough. In the video, I also dive into setting up shipping for the international zone and how to enable the international market in Shopify. Be sure to give it a watch!
Best Shopify Apps for Managing Shipping:
If you’re not handling shipping on your own, the best way to streamline the process is by integrating shipping apps with your Shopify store. These apps make managing shipping a breeze, as they often come with built-in integrations for the most popular couriers like UPS, FedEx, DHL, and USPS.
Not only do they automate label printing and order tracking, but many of them also offer features like real-time shipping rates, bulk label printing, and even discounted shipping rates through their courier partnerships. This can save you both time and money, while ensuring your customers get accurate shipping options at checkout.
Here are some popular Shopify shipping apps you might want to check out:
- ShipStation: A comprehensive shipping solution that helps you manage orders and print labels from multiple carriers.
- Easyship: This app gives you access to a global network of couriers and automatically calculates taxes, duties, and shipping rates.
- Advanced Shipping Rules: Customize your shipping rates based on product type, weight, or customer location for more control over how you charge.
- Parcelify: Great for businesses needing advanced customization options like free shipping over a certain amount or region-specific rates.
Wrapping Up:
Setting up shipping on Shopify might seem overwhelming at first, but once you understand the different options available—flat-rate, weight-based, and carrier-calculated—it becomes much simpler. By choosing the right method and using helpful apps, you can streamline the shipping process for both you and your customers.