How to Add a Cookie Banner on Shopify Without Using Any Third-Party App

Adding a cookie banner to your Shopify store has never been easier! In the past, store owners often had to rely on third-party apps—many of which came with monthly subscription fees—to implement a cookie banner. But thanks to Shopify’s latest core system update, you can now add a cookie banner seamlessly and cost-effectively without any external apps.
In today’s article, we’ll guide you through the process of adding a cookie banner to your Shopify store step by step.
What is a Cookie Banner?
If you’ve ever visited a website and seen a small pop-up asking you to accept cookies, that’s a cookie banner! A cookie banner is a notification that informs users about a website’s use of cookies—small data files stored on a visitor’s browser that help improve site functionality, track user behavior, and enhance the overall experience.
Why is a Cookie Banner Important?
A cookie banner isn’t just a polite way to ask for permission; it’s also a legal requirement in many regions, including the European Union (GDPR) and California (CCPA). These laws aim to protect users’ privacy by ensuring they have control over how their data is collected and used. Beyond compliance, having a cookie banner builds trust with your visitors, showing that you’re transparent about data practices.
Adding a Cookie Banner to Your Shopify Store
Now that we understand what a cookie banner is and why it’s essential, let’s dive into how you can easily add one to your Shopify store. Shopify’s built-in tools make it simple and cost-effective to implement a cookie banner without needing third-party apps. Stay tuned as we walk you through the process step-by-step!
If you’re short on time or prefer visuals, feel free to check out the video below instead of reading the full article:
Step 1: Access the Customer Privacy Tab
The first step in adding a cookie banner to your Shopify store is accessing the Customer Privacy tab. Here’s how you can do it:
- Log in to your Shopify dashboard.
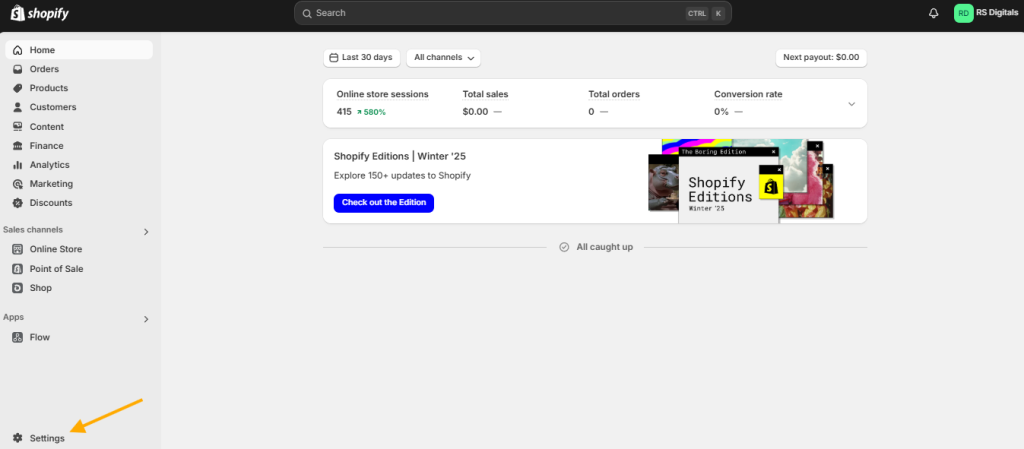
- Click on Settings in the bottom-left corner.
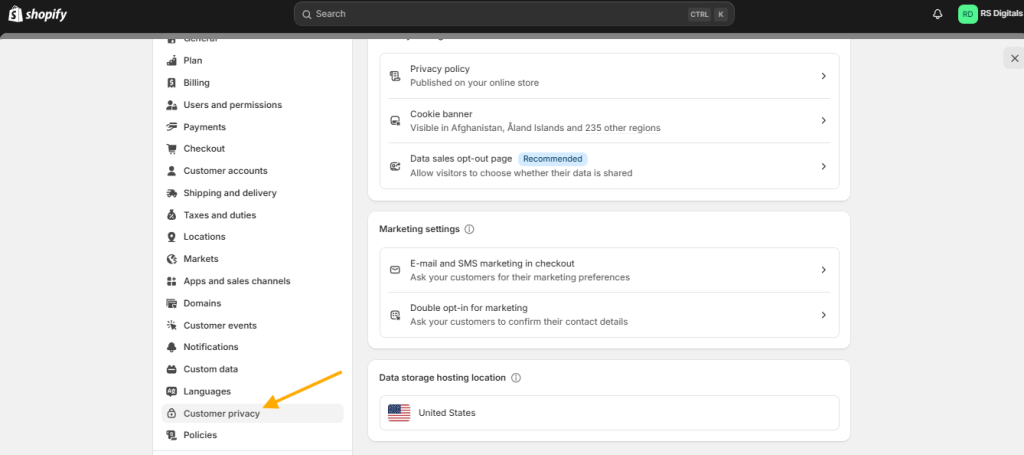
- Scroll down and select Customer Privacy from the menu.
For visual guidance, feel free to check out the attached screenshots below!
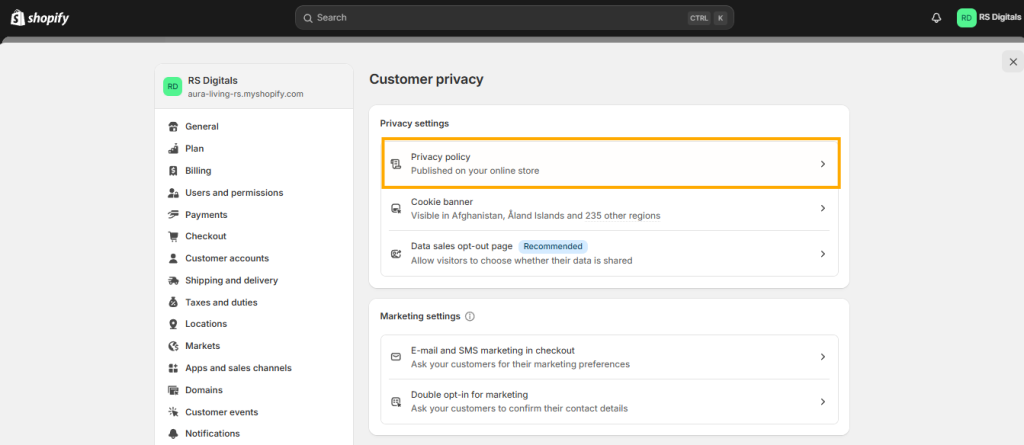
On the Customer Privacy page, you’ll find all the options needed to set up and enable the cookie banner for your Shopify store. The first option is Privacy Policy, where you can add content for your store’s privacy policy page.
For a visual reference, check the attached screenshot below!
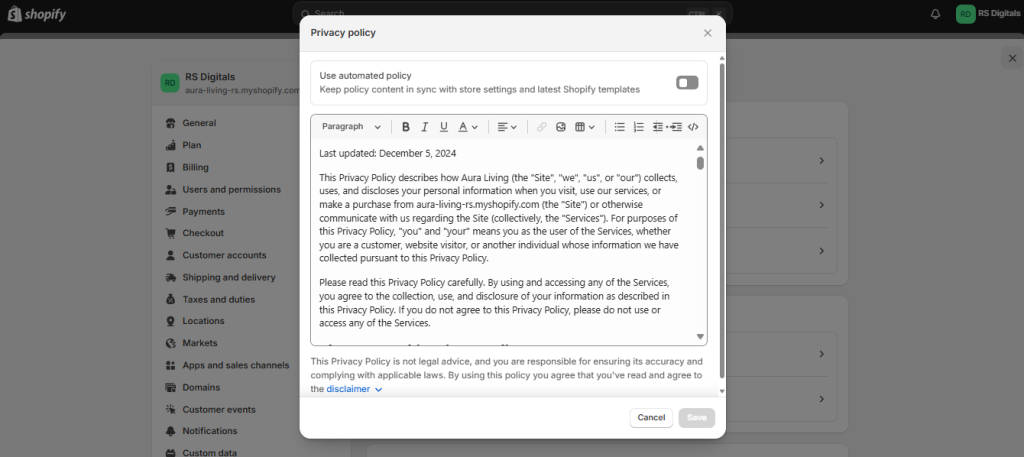
A pop-up page will appear after you click on “Privacy Policy” Option where you can add the content for your privacy policy page.
Check the attached screenshot below for reference!
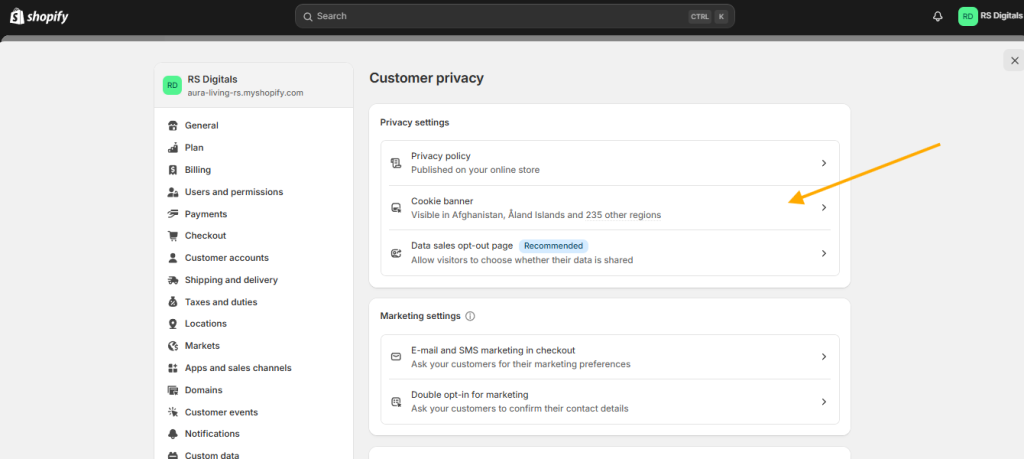
The next option is the Cookie Banner, where you can customize its appearance, select specific countries to display it, and adjust other settings. Simply click on it, and we’ll go through all the available options in this tab one by one.
See the screenshot below for visual guidance!
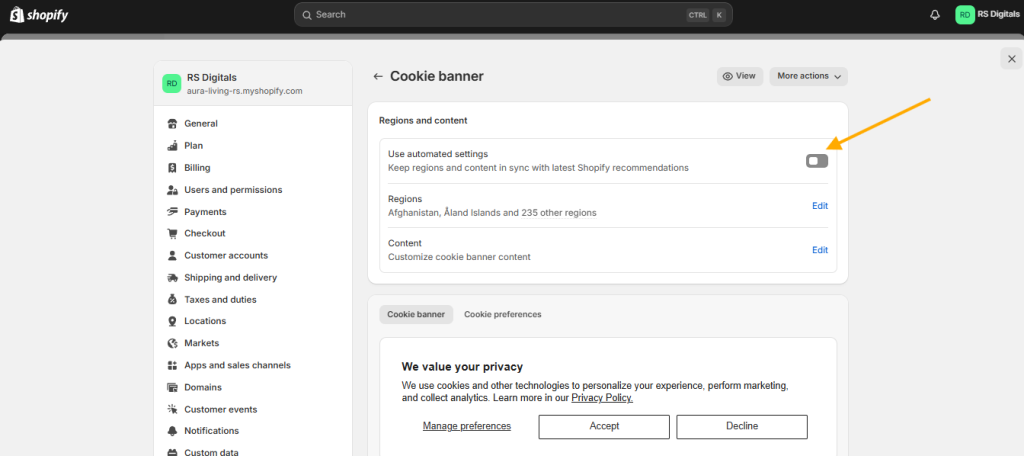
The first option you’ll see after clicking on the Cookie Banner tab is Use Automated Settings. This feature allows Shopify to automatically display the cookie banner in recommended countries using predefined settings. It’s entirely up to you whether you want to enable or disable this option.
If you enable it, there’s no need to manually select the countries where you want the cookie banner to appear. However, if you choose not to enable it, you’ll need to specify the countries yourself and can also customize the cookie banner text to align with your store’s requirements.
Check the attached screenshot below for reference!
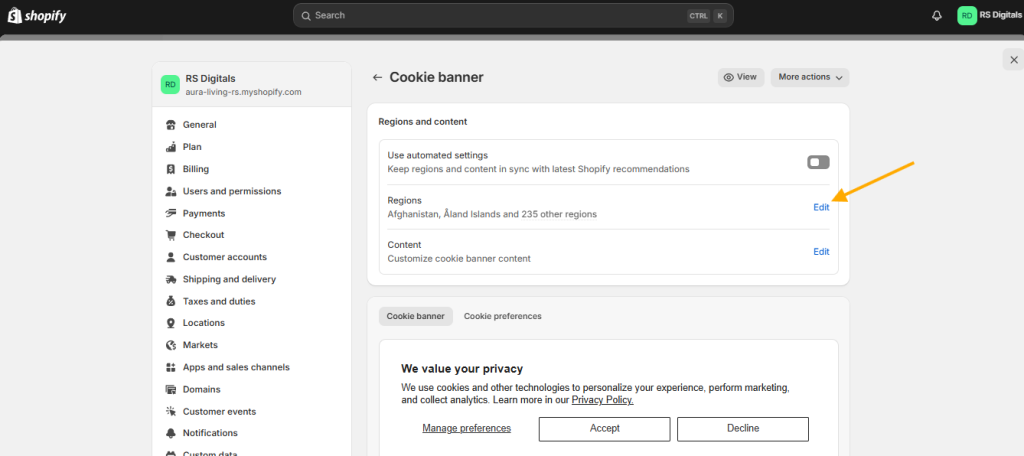
The next setting option is Regions, where you can choose the countries where the cookie banner will appear. To customize this, simply click the Edit button and select the desired countries.
For a step-by-step visual guide, check the attached screenshot below!
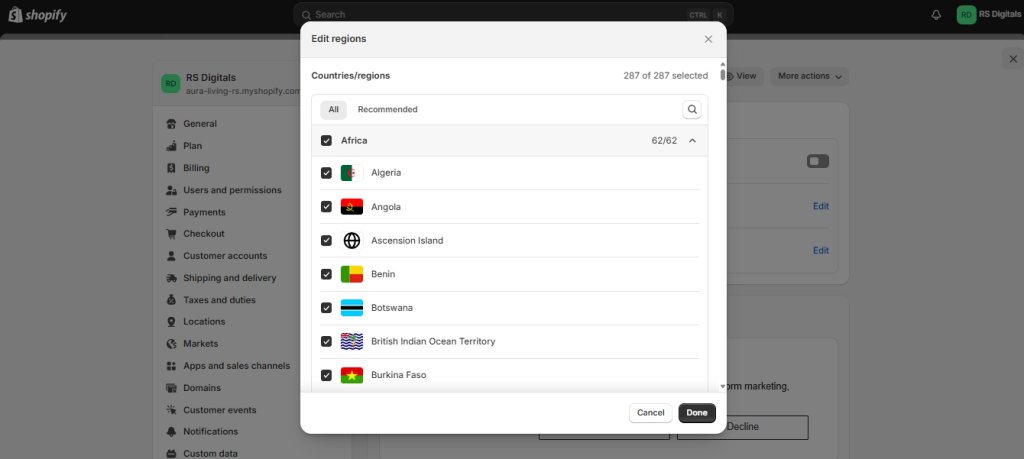
When you click the Edit button next to the Regions setting, you’ll notice two tabs: Recommended and All.
- The Recommended tab shows the countries Shopify suggests for displaying the cookie banner.
- The All tab lists every country.
It’s entirely up to you whether you want to show the cookie banner in the recommended countries or across all regions. However, I recommend enabling the cookie banner specifically for the countries where you’re actively selling, as this helps ensure compliance with local regulations.
check the attached screenshot below!
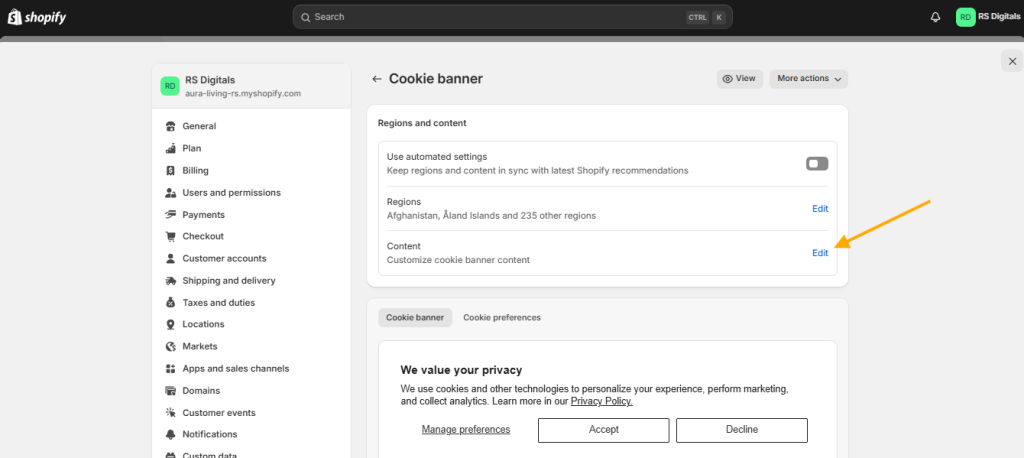
The next setting is Content, where you can customize the text displayed on your cookie banner. This includes:
- Title: The headline of your cookie banner.
- Body: The main message to inform visitors about cookies.
- Button Text: The text displayed on the action buttons.
- Links: Add relevant links, such as to your privacy policy.
- Preferences Content: Adjust the information for the preferences section.
Check the attached screenshot below for a clear visual guide!
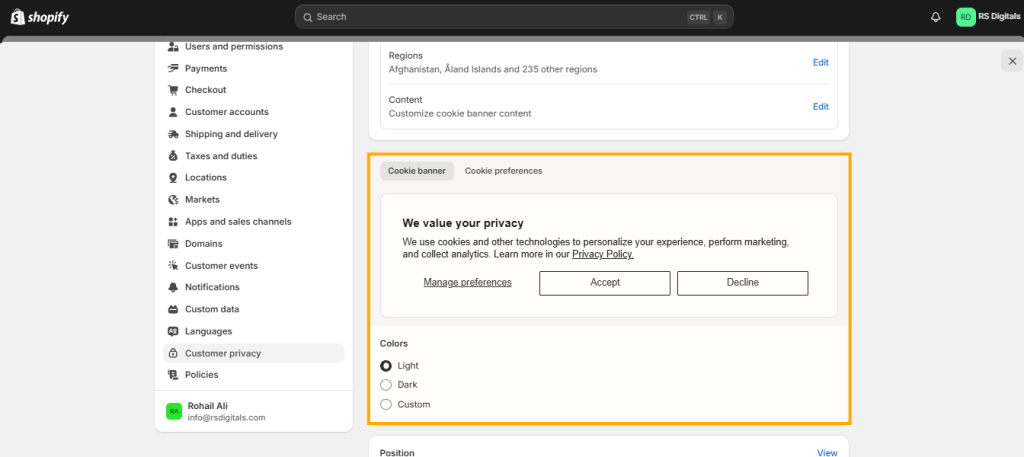
In the next section, you can customize the background and text color of your store’s cookie banner. Shopify provides three options for you to choose from:
- Light: A preset with a white background and black text.
- Dark: A preset with a black background and white text.
- Custom: This option allows you to select custom colors for the background, text, and buttons, enabling you to align the cookie banner with your store’s branding.
Additionally, you can preview how the cookie banner will look directly within this section. This ensures you can make adjustments before publishing it live.
Check the screenshot below for a visual guide!
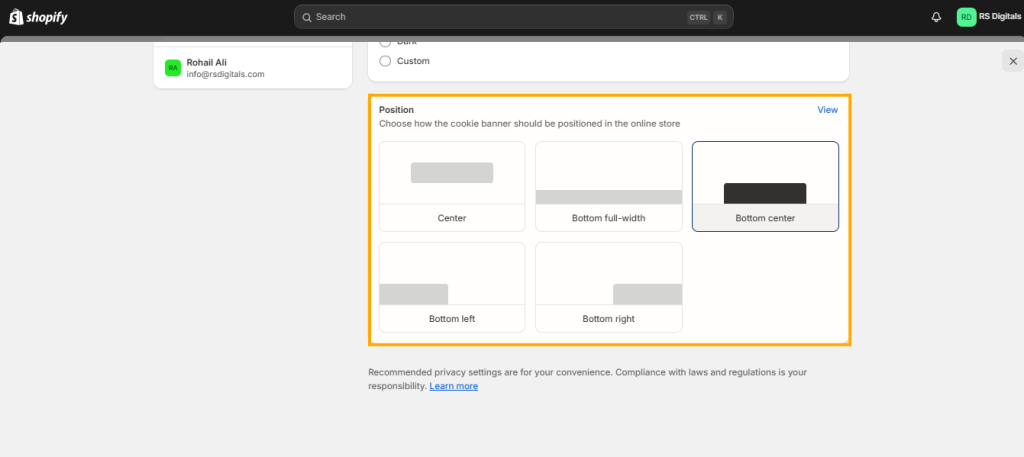
In the final section of the Cookie Banner page, you’ll find several placement options to choose from. These determine where the cookie banner will appear on your Shopify store. Here’s a breakdown of the available options:
- Center: Displays the cookie banner prominently in the center of your website.
- Bottom Full-Width: Shows a full-width cookie banner at the bottom of your store.
- Bottom Center: Places the cookie banner at the bottom center of your website.
- Bottom Left: Positions the cookie banner at the bottom left corner of the site.
- Bottom Right: Displays the cookie banner at the bottom right corner of your store.
Each option offers flexibility to match your website’s design and user experience preferences.
Check the screenshot below for visual guidance!
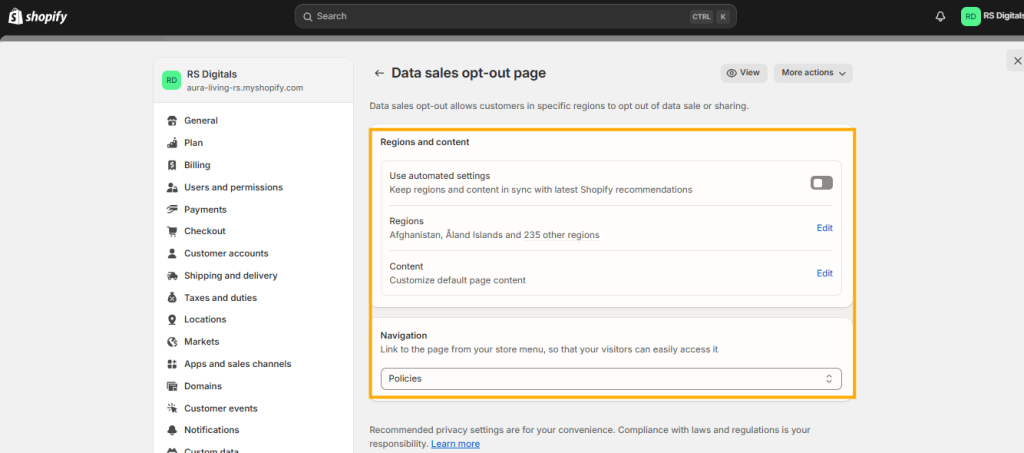
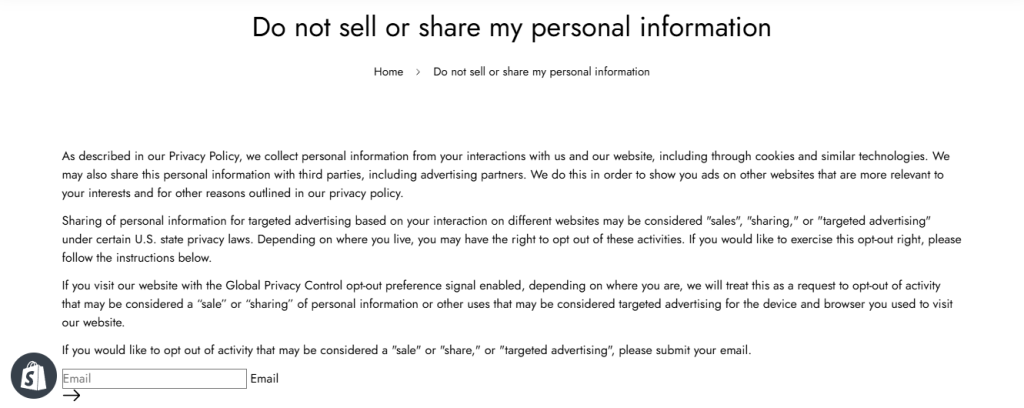
Now, let’s talk about the Data Sales Opt-Out page. This page is crucial for ensuring compliance with privacy regulations like the California Consumer Privacy Act (CCPA). It allows your customers to opt out of having their personal data sold to third parties. Shopify makes it easy to create and manage this page, ensuring your store aligns with legal requirements while building trust with your customers. A clear and accessible opt-out page can enhance transparency and strengthen your brand’s reputation.
Check the attached screenshot for a quick visual guide!
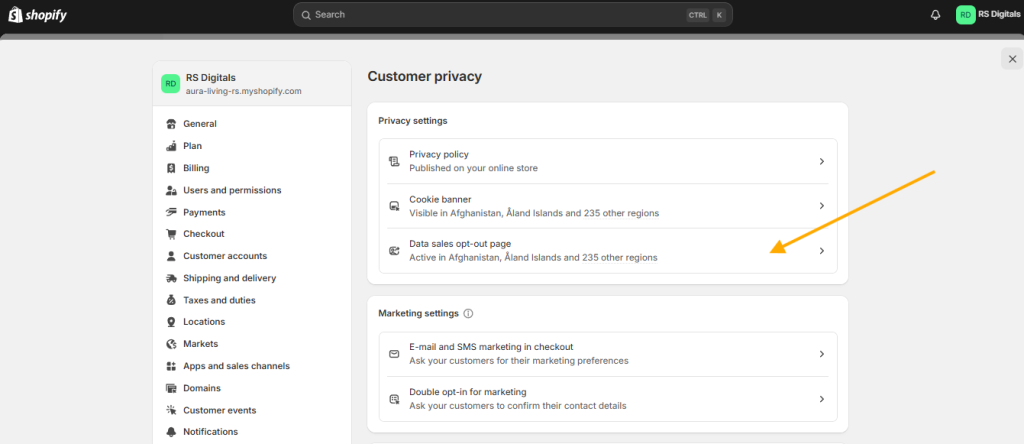
There are three key options for this setting, explained below:
- Use Automated Settings: This option ensures the Data Sales Opt-Out page is displayed only in the countries or states where it’s legally required. It also includes an email input field, allowing customers to opt out of receiving marketing emails or other communications from your store.
- Regions: In this setting, you can manually select the countries or regions where you want this page to appear.
- Content: Customize the content of this page to align with your store’s branding and legal requirements. Add details that resonate with your audience while ensuring compliance.
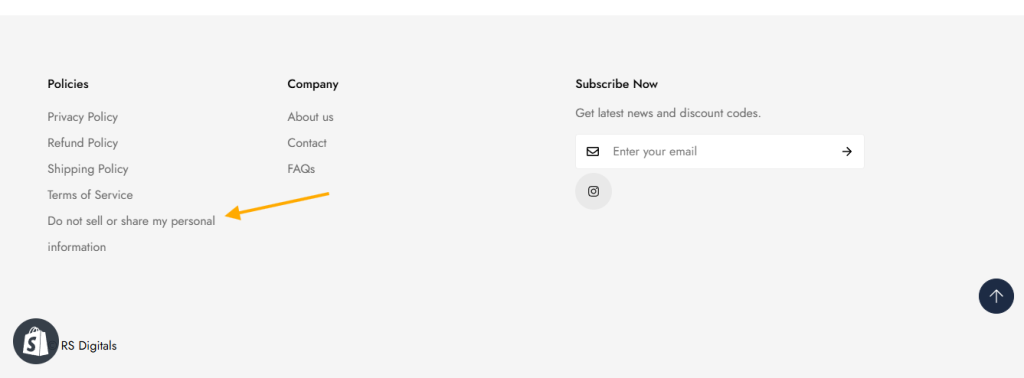
- Navigation: Decide where to include the link to this page in your store’s navigation menu. For instance, you might want to add it to your footer menu for easy accessibility.
Sounds simple, right? Check the screenshot below for a visual walkthrough!
Here’s a sneak peek of what this page looks like on the storefront!
Wrap-Up
Adding a cookie banner to your Shopify store is a straightforward process that doesn’t require any third-party apps. With Shopify’s built-in features, you can ensure compliance with privacy regulations and enhance user experience with minimal effort. Follow the steps outlined in this guide, and you’ll have a fully functional cookie banner tailored to your store’s needs. Make sure to review your settings and customize the look to match your brand, and you’ll be all set!

