How to Create a Navigation Menu for the Header and Footer in Shopify

Creating a well-organized navigation menu is essential for enhancing your Shopify store’s user experience. In this guide, I’ll walk you through how to set up navigation menus for both the header and footer of your store. We’ll also cover how to add links to collection pages, informational pages, and legal policies in your navigation.
By the end of this tutorial, we’ll have created three separate navigation menus: one for the header and two for the footer. Let’s dive in and get started!
Step 1: Prepare Your Collections, Pages, and Legal Policies
Before we begin building the navigation menus, it’s important to have the content ready. Here’s what you’ll need:
- Collections: Organize your products into categories to make browsing easier for your customers.
- Web Pages: Create pages like About Us, Contact Us, or FAQs for essential store information.
- Legal Policies: Draft and publish your store’s policies, such as Terms of Service, Privacy Policy, and Refund Policy.
Once you’ve got these ready, we can start building the navigation menus.
If reading isn’t your thing, don’t worry—we’ve got you covered! Check out the complete video version of this guide and follow along effortlessly.
Step 2: How to Create Collections in Your Shopify Store
Creating collections is a key step in organizing your Shopify store, making it easier for customers to find what they need. Here’s how to set up collections quickly:
- Open your Shopify Dashboard.
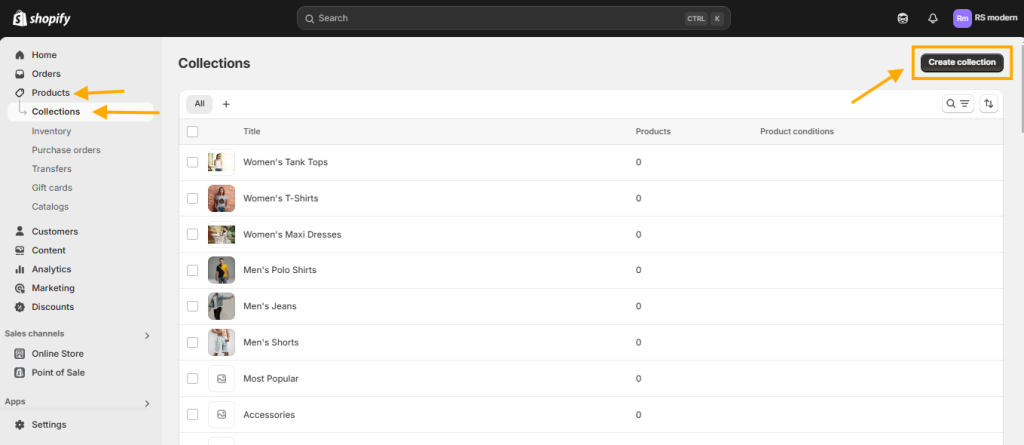
- Navigate to Products > Collections.
- Click the Create Collection button to start building a new collection.
To make this process even easier, check out the attached screenshot below for a visual guide!
Step: 2.1: Defining Your Collection: Title, Description, and Type
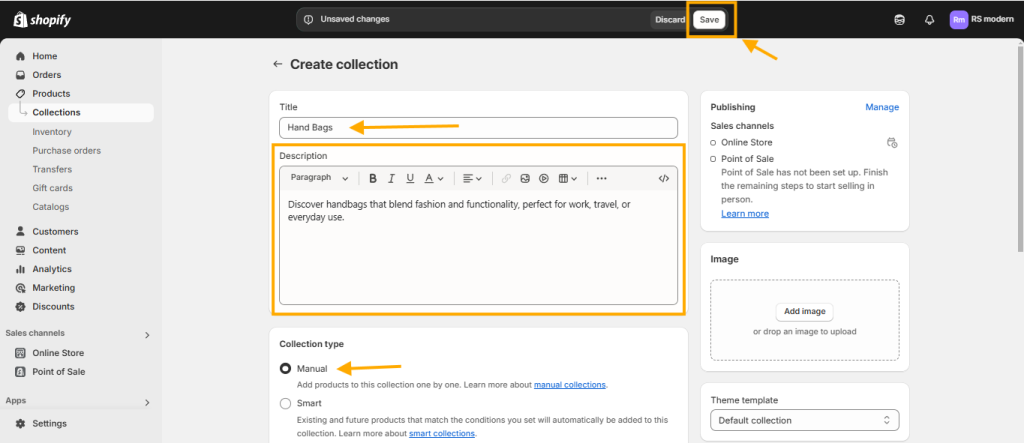
On the next page, you’ll be prompted to set up the details of your collection. Here’s a breakdown of what you’ll need to do:
- Collection Title: This is the name of your collection and will appear as the title of the collection page. Choose a name that clearly represents the group of products you’re showcasing.
- Collection Description: Use this section to provide details about your collection. A well-written description can help inform and engage your customers.
- Collection Type: Shopify offers two types of collections to choose from:
- Manual Collection: Add products to this collection manually. This option gives you complete control over which products are included.
- Smart Collection: Define specific conditions, and products that meet these criteria will be automatically added to the collection.
For this guide, I’ll demonstrate how to create a Manual Collection.
Once you’ve added the title, description, and selected your collection type, click the Save button at the top of the page. Check out the attached screenshot for a visual reference!
You can create as many collections as you need by following the steps outlined above. Now, let’s move on to the next step: creating informational web pages for your Shopify store.
Step 3: How to Create Informational Pages on Shopify
To create essential informational pages for your Shopify store, follow these simple steps:
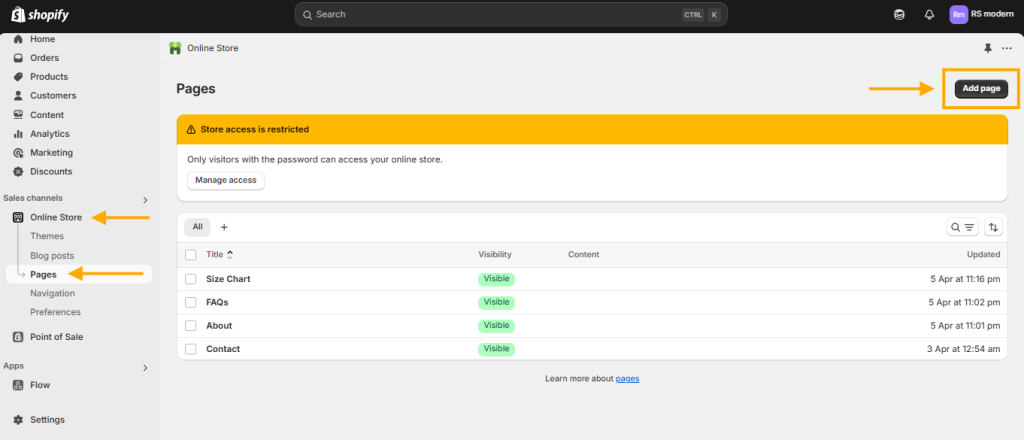
- Go to your Shopify Dashboard.
- Click on Online Store in the menu.
- Navigate to Pages.
- Click the Add Page button located at the top right of the screen.
For a visual guide, refer to the attached screenshot. These pages are perfect for sharing important information like About Us, Contact Us, or FAQs with your customers.
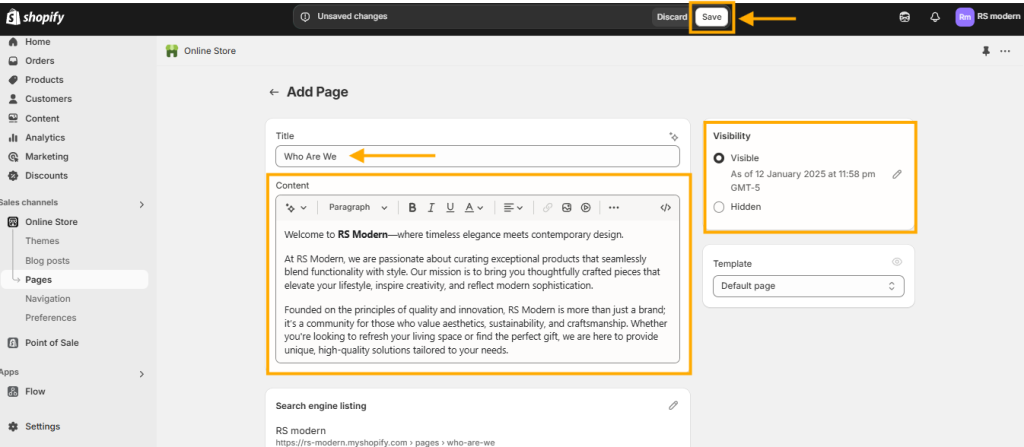
On the next screen, you’ll find options to add details about the page you’re creating. Let’s break it down:
- Title Section: This is where you name your page. For example, I’m naming mine “Who Are We”.
- Content Section: Add the content for your page here. This is where you can tell your story or provide essential information for your visitors.
- Visibility Section:
- Visible: Choose this option if you’re ready to publish the page immediately.
- Hidden: Select this option to save the page as a draft, keeping it invisible to your store visitors until you’re ready to go live.
For this guide, I’m selecting the Visible option since I want to publish the page right away and add it to the navigation menu.
Check out the attached screenshot for a visual reference to help guide you through the process!
Congratulations! You’ve successfully created a page. Now you can easily create as many pages as you need for your Shopify store.
Next, we’ll move on to setting up your legal policy pages. Once that’s complete, we’ll dive into creating the navigation menus for your store’s header and footer. Let’s keep building!
Step 4: How to Create Legal Policy Pages on Your Shopify Store
Setting up your legal policy pages is essential for building trust with your customers and ensuring compliance. Follow these simple steps to create important pages like Privacy Policy, Terms of Service, Shipping Policy, and Return Policy:
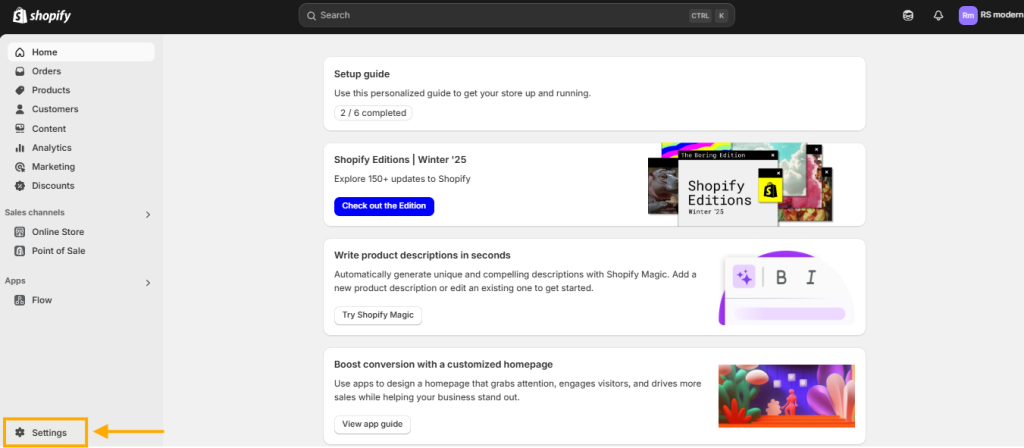
- Open your Shopify Dashboard and click on Settings.
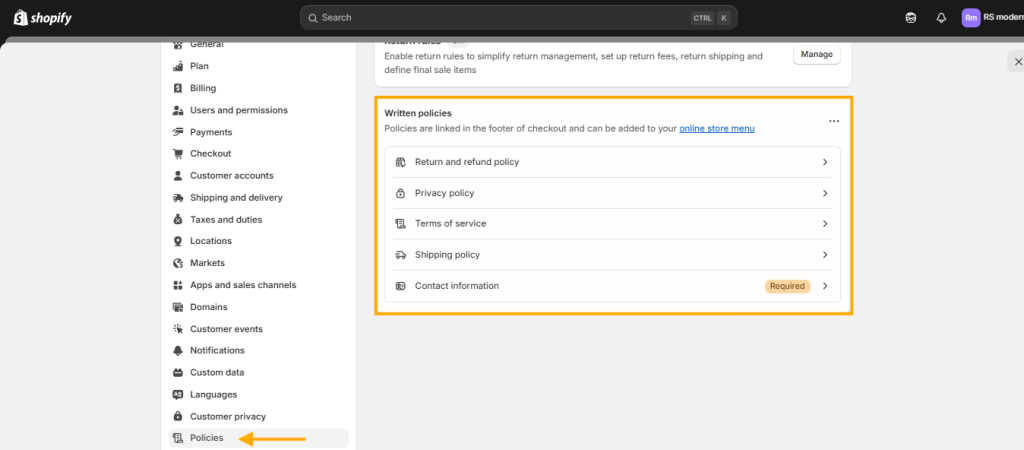
- Navigate to the Policies section.
- Under “Written Policies,” you’ll see options to add all the necessary legal policy pages for your store.
These policy pages provide transparency and help your customers feel confident when shopping with you.
For a visual guide, refer to the two attached screenshots below:
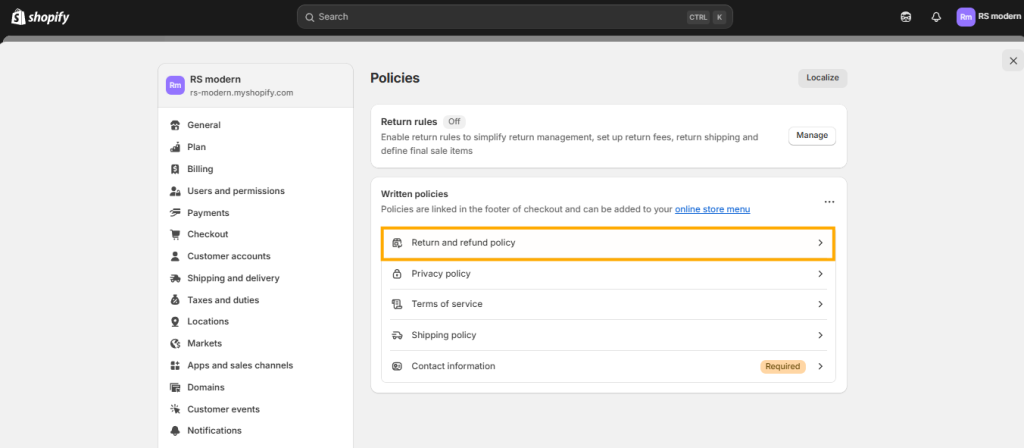
To edit a legal policy page, simply click on any of the listed options. For this guide, I’ll demonstrate how to add content to the Return and Refund Policy page. However, you can use the same steps to create all other legal policy pages.
- Click on Return and Refund Policy to start editing.
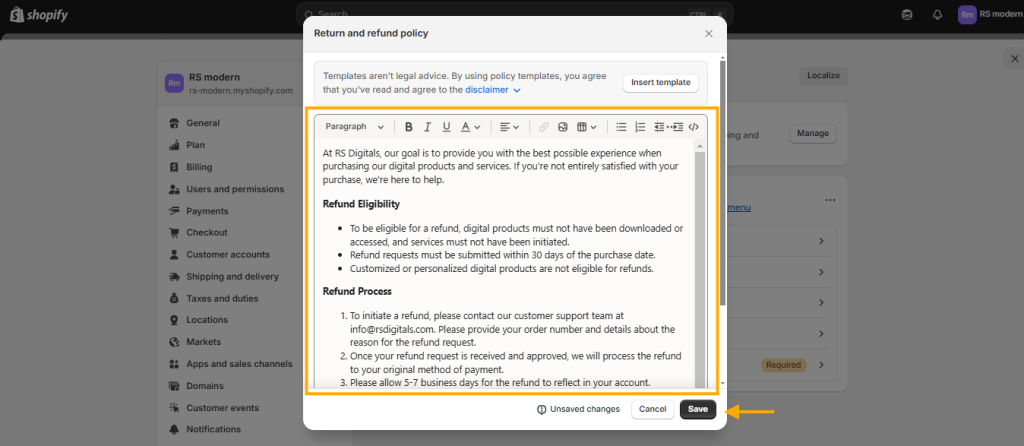
- In the text section, add the content for your refund policy.
- Once you’re done, click the Save button to publish the policy page.
It’s that easy! Refer to the two screenshots below for a visual guide to help you through the process:
Now that we’ve covered the essentials—creating collections, web pages, and legal policies—we’re ready to move on to the final step: building navigation menus for your store.
This is where everything comes together, making it easier for your customers to browse through your collections, access informational pages, and find important legal policies. Let’s dive into creating seamless navigation menus for your Shopify store!
Step 5: Creating a Navigation Menu
To set up your navigation menu, follow these simple steps:
- Go to your Shopify Dashboard.
- Click on Content and navigate to Menus.
- Click the Create Menu button to start building your navigation.
This step will help you organize your store and make it easy for customers to find what they’re looking for. Refer to the screenshot below:
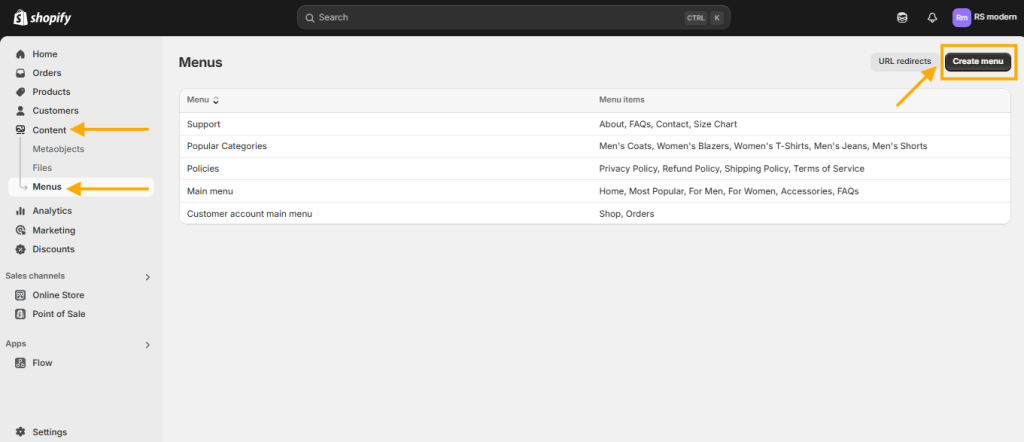
On the next page, you’ll find options to create a menu. Here’s a quick breakdown:
- Name: This is where you name your menu. Giving your menu a clear name is essential as it helps you easily identify it in the theme editor. For instance, I’ll name mine “Header Menu” for the header navigation.
- Add Menu Item: This feature allows you to add links to your menu, such as collections, web pages, or legal policy pages. For the header menu, I’ll be adding collection links, but you can customize it to include any links you prefer—it’s entirely up to you!
Refer to the screenshot below for a visual guide to help you set up your menu effortlessly.
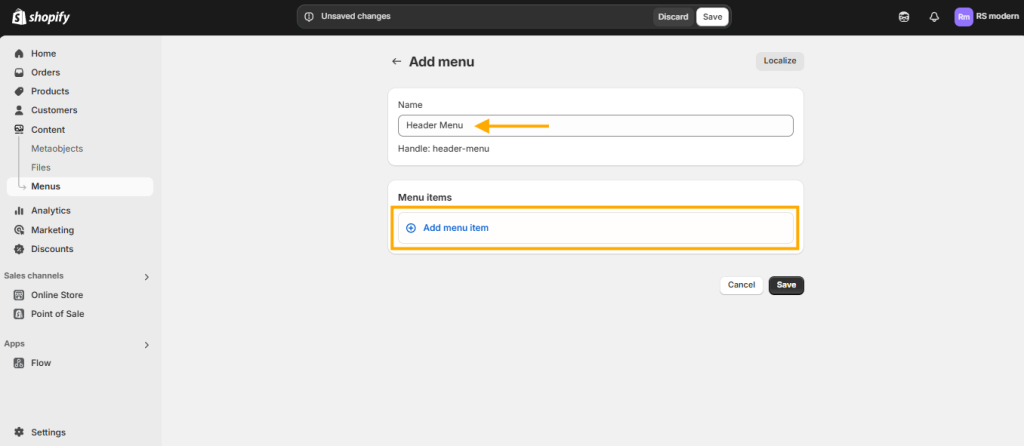
Now, click on the Add Menu Item box, and you’ll see two fields to fill out:
- Label: This is where you name your menu item. The label you enter here will be displayed in your store’s menu.
- Link: In this field, you’ll select a collection, page, or other destination to assign a URL to your menu item.
Refer to the screenshot below for a visual guide to help you set it up easily!
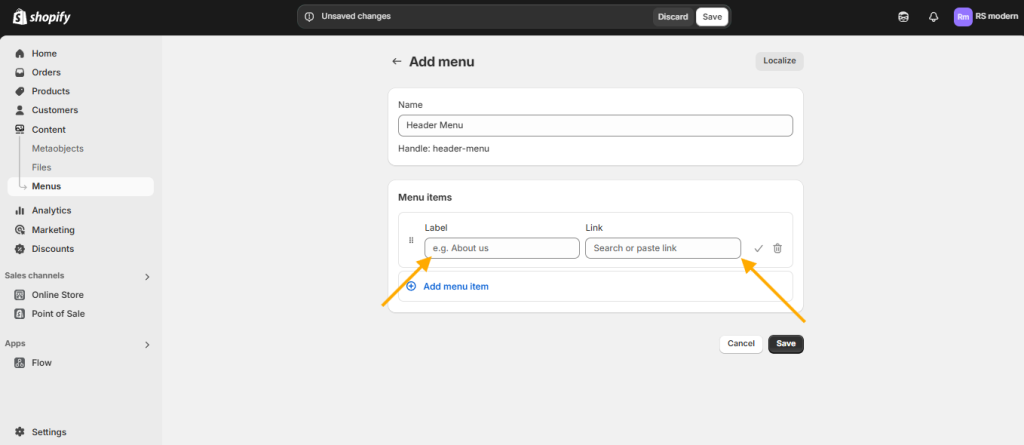
When you click on the Link box, a dropdown with multiple link options will appear. Since I’m adding collection links to the header menu, I’ll select Collections from the dropdown.
Check out the attached screenshot for a visual reference to guide you through the process!
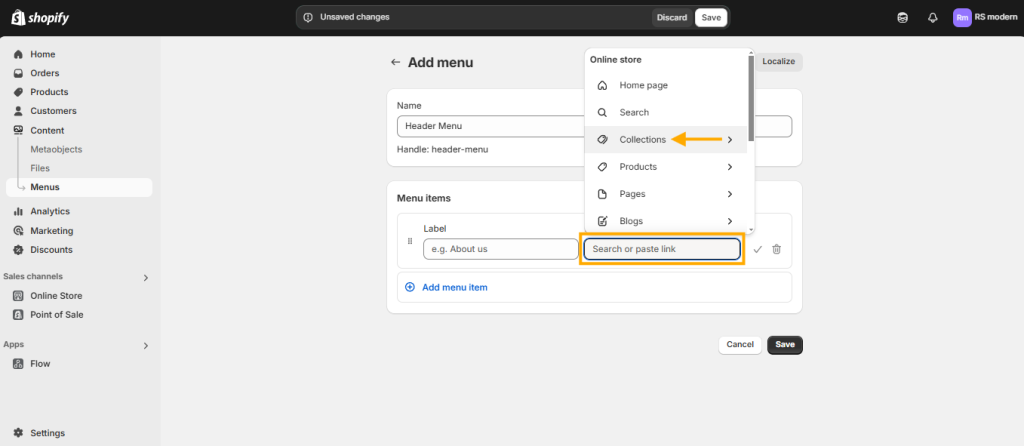
Once you select Collections from the dropdown, you’ll see a list of all the collections you’ve created in your store. Now, simply choose the collection you want to add to the menu, and it will be automatically added.
For a clearer view, check out the attached screenshot for reference!
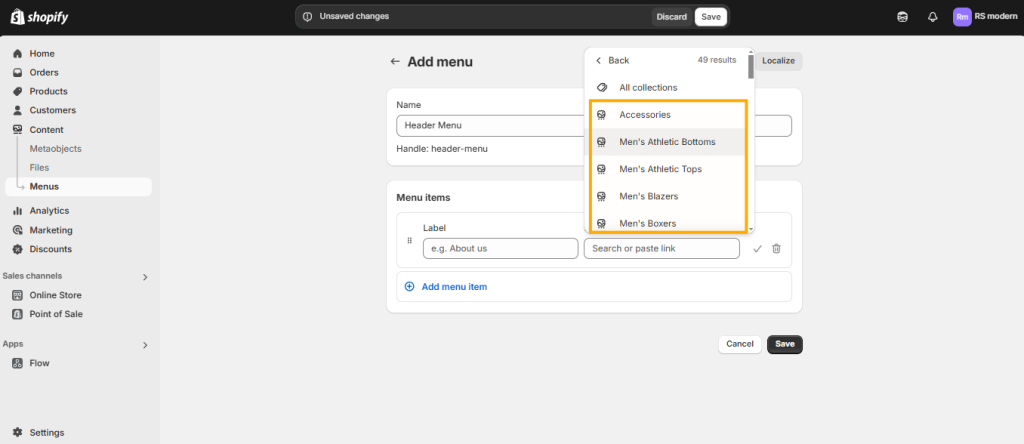
I’ve selected “Accessories Collection” for the link, and for the label, I’ve used the same name as the collection. After choosing the link, simply click the checkmark on the right side of the box to add the menu item. Then, don’t forget to click the Save button to save your changes.
For a clearer guide, check out the attached screenshot!
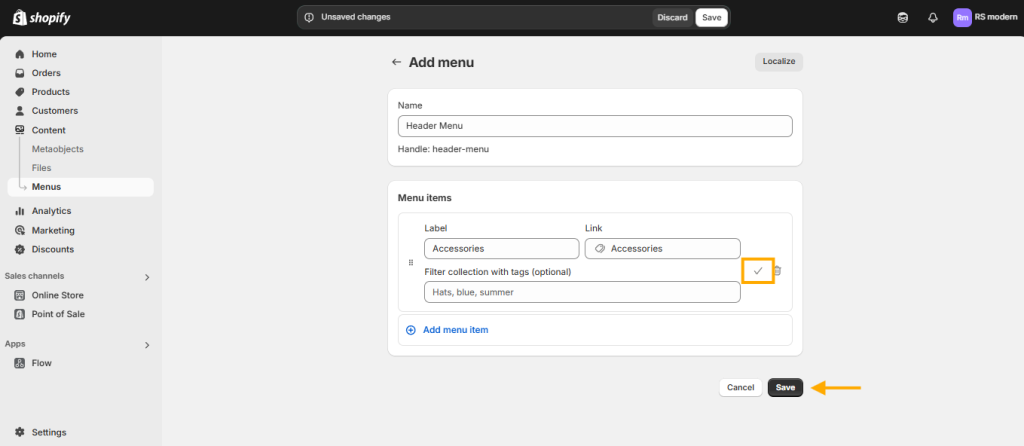
Check out the screenshot below to see how it looks once you click the checkmark on the right side.
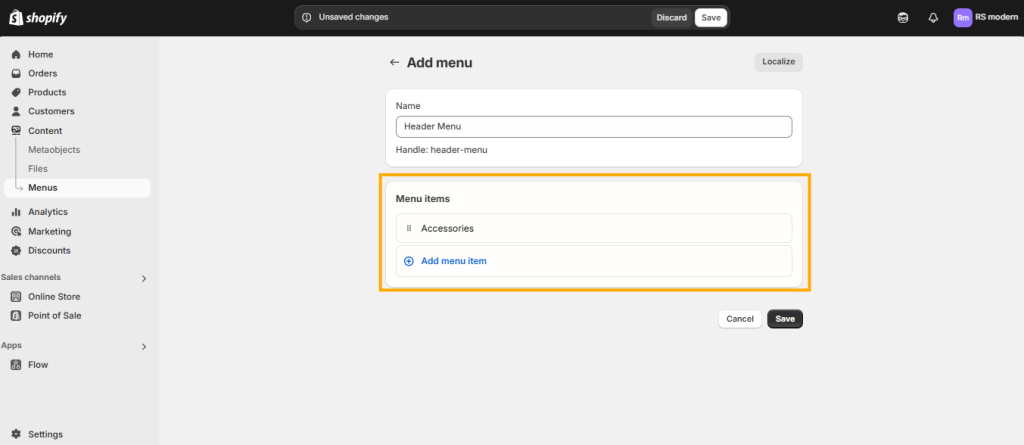
Next, I’ll add a few more links to the header menu using the same method. For the pages and legal policies menu, you’ll need to create a new menu just like we did for the main header menu.
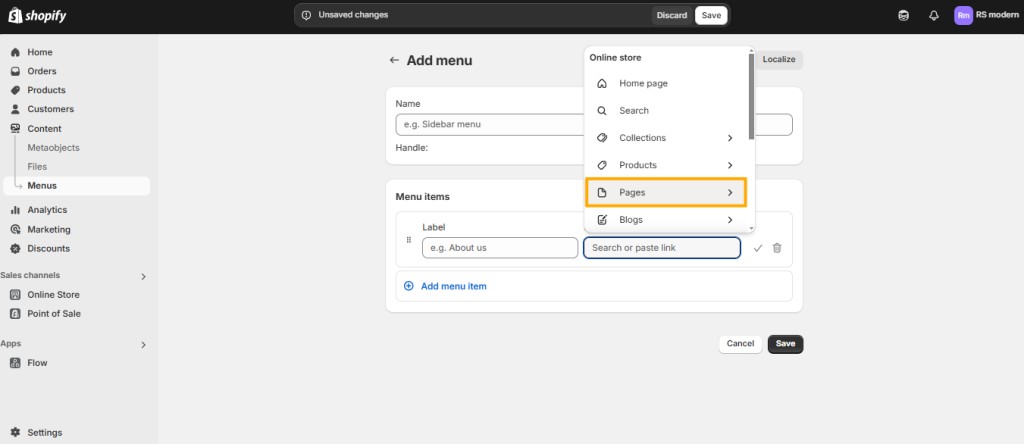
To add web page links, simply select Pages from the link dropdown. For legal policy links, choose Policies from the dropdown.
Check out the attached screenshots for a visual guide of both the Pages and Legal Policies dropdowns!
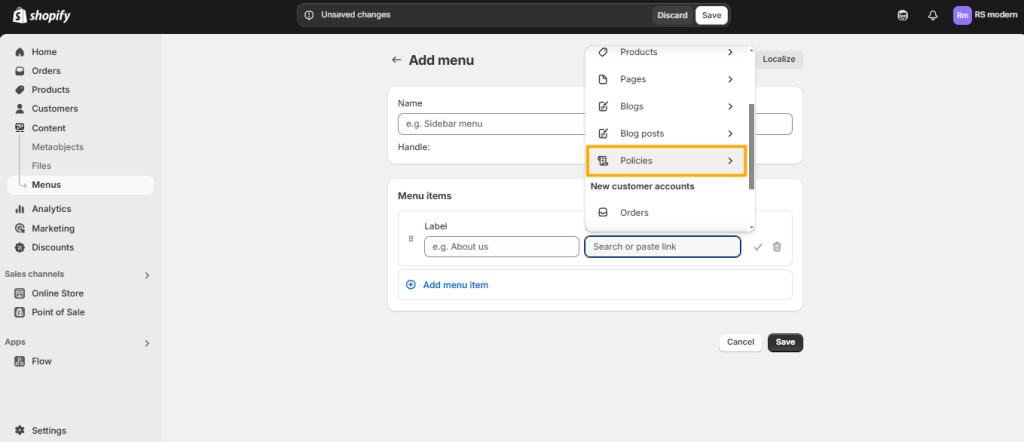
Now that we’ve created three different menus—Header Menu for the top navigation, and Pages and Policies Menu for the footer—let’s add them to the storefront. This will make it easier for your visitors to navigate your store and find exactly what they’re looking for, without any hassle.
Step 6: Displaying the Menus on Your Storefront
Now that we’ve created the menus for our store, it’s time to display them on the storefront. Here’s how to do it:
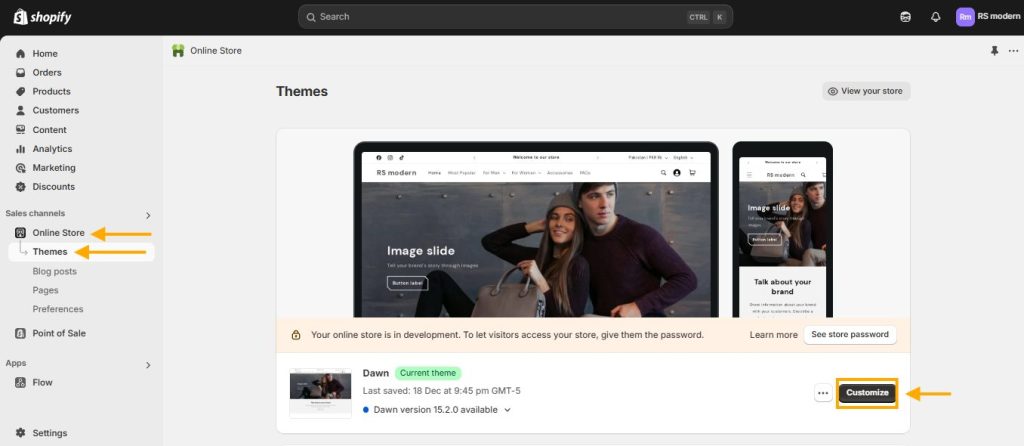
- From your Shopify Dashboard, click on Online Store, then select Themes.
- Click the Customize button to open the theme editor.
In this tutorial, I’m using the Dawn theme, version 15.2.0. If you’re using a different theme, you may see slightly different options in your theme editor. However, if you’re using Dawn, the steps I’ll describe should match, and you’ll be able to display your menus in both the header and the footer.
Check out the attached screenshot for a visual reference!
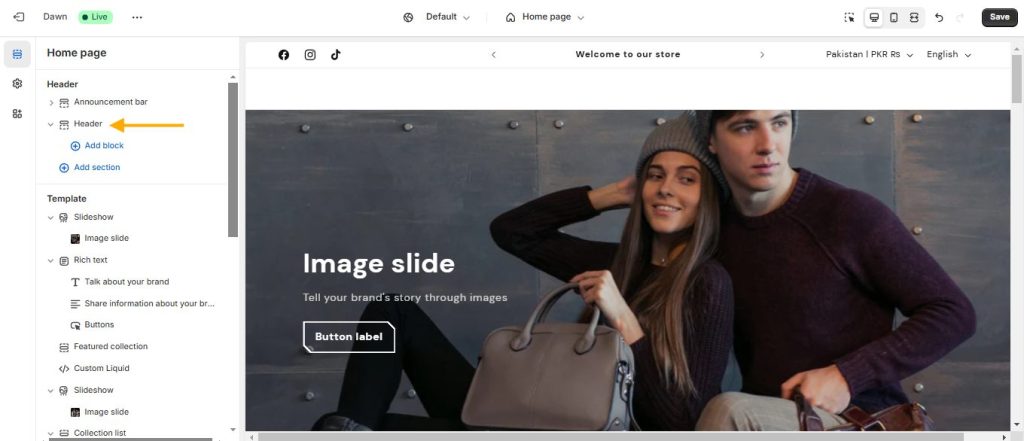
In the theme editor, click on the Header section under the Header Area on the left side.
Check out the attached screenshot for a clearer view.
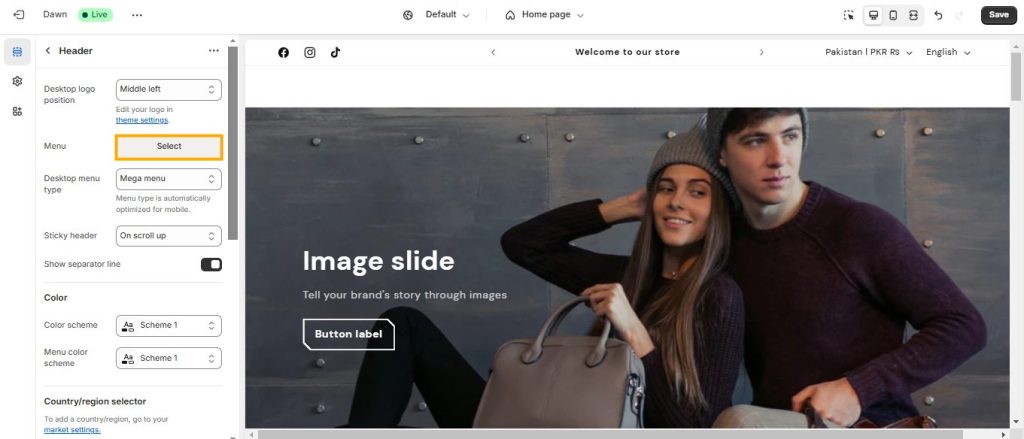
Next, click the Select button next to Menu to choose the menu for your header.
Take a look at the attached screenshot for reference.
Once you click Select Menu, you’ll see all the menus you’ve created for your store. For this tutorial, I’ll be selecting the Header Menu for the top navigation.
Please refer to the attached screenshot for a visual guide!
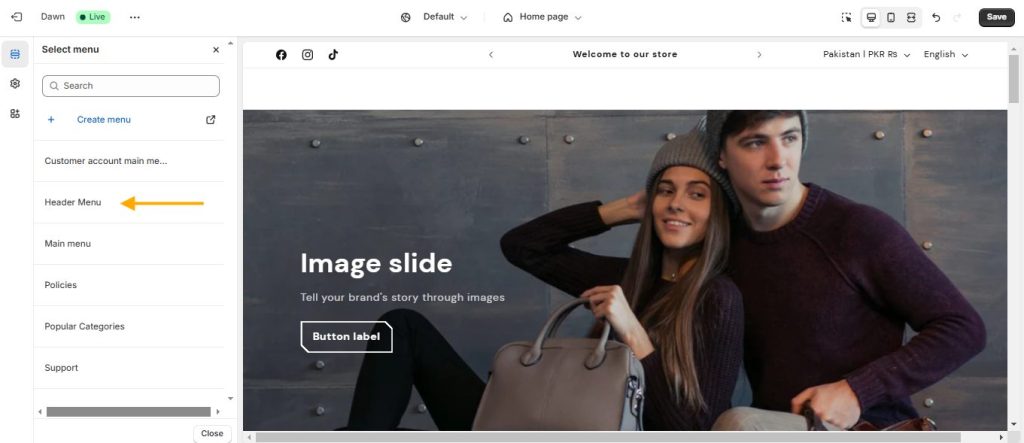
Here’s how it will look after you’ve selected a menu for the header.
Check out the attached screenshot below for a visual reference!
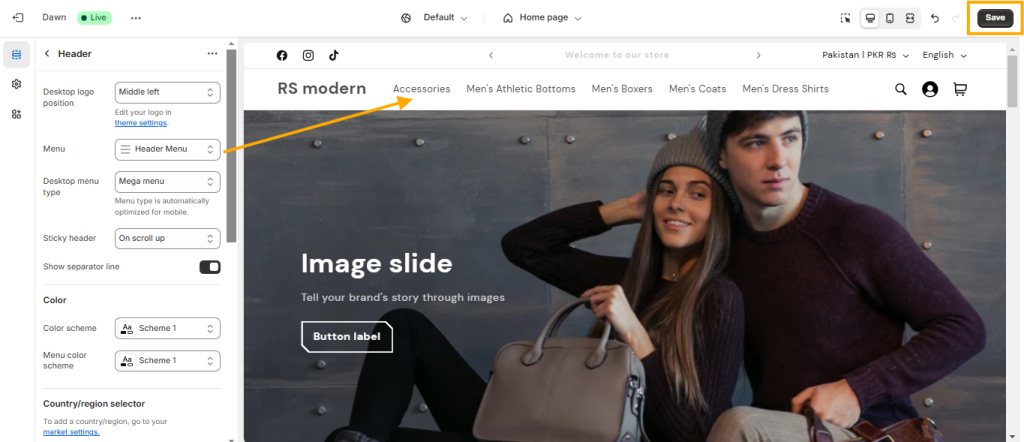
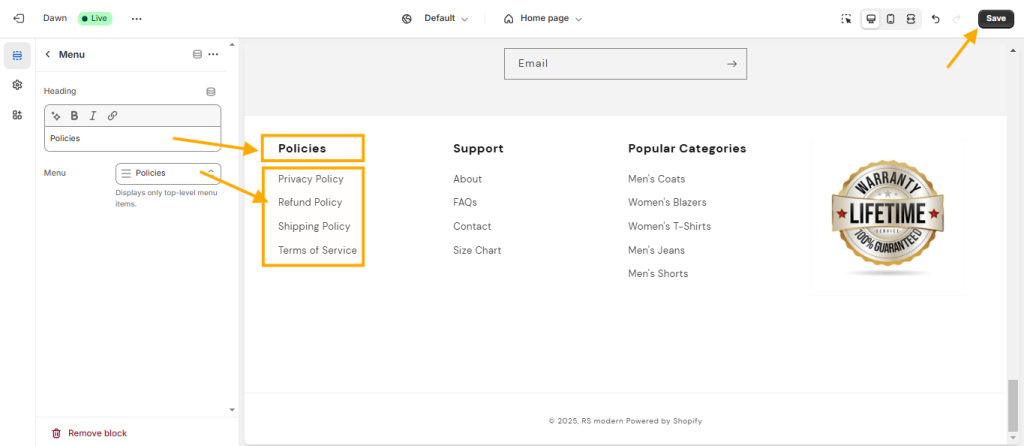
And don’t forget to click the Save button at the top right (as I’ve highlighted above) after selecting your menu to save the changes!
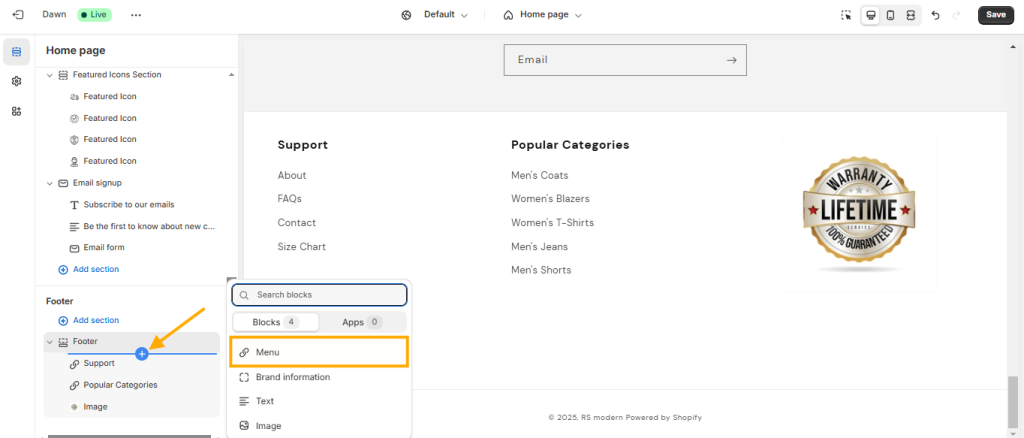
For the footer, navigate to the Footer section on the left sidebar. Then, click the + icon to add a block to the footer area.
When you click the + icon, a dropdown will appear with the options available for your theme’s footer. Keep in mind, this dropdown might look different if you’re using another version of the Dawn theme or a different theme entirely.
Check out the attached screenshot for a visual guide!
Check out the screenshot below to see how it looks when you add the menu block without selecting a menu.
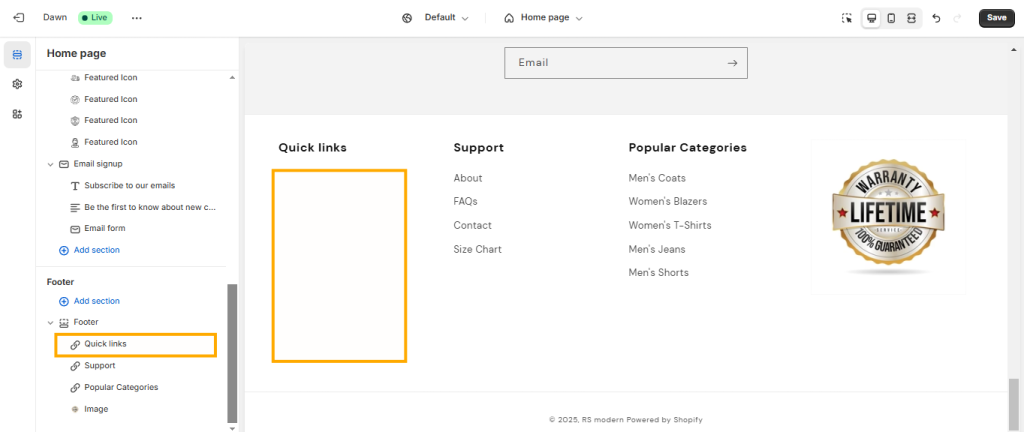
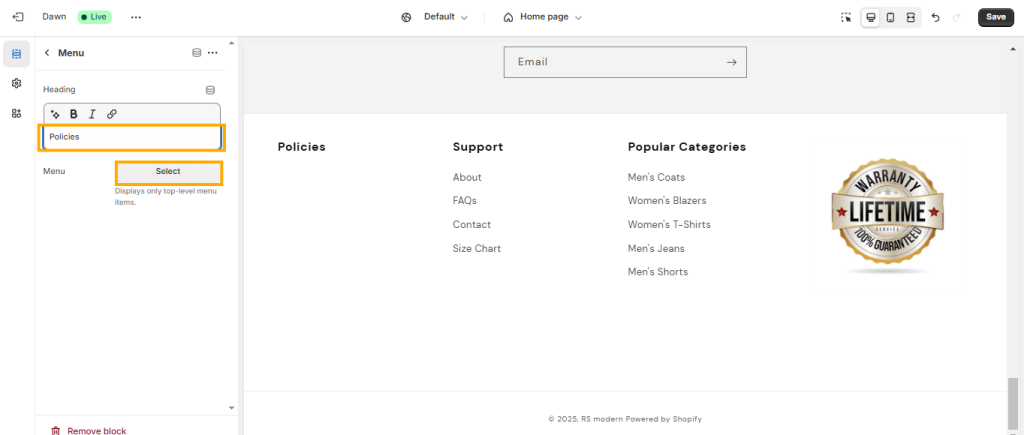
After you click on the menu block, you’ll see two options:
- Heading Box: This is where you can set the heading for the menu in the footer.
- Select a Menu: This works the same way as it did for the header. When you click on the Select button, you’ll see all the menus you’ve created in your store. Simply choose the menu you want to add to this block.
Check out the attached screenshot for a visual reference!
Check out the screenshots below to see the final results. And don’t forget to hit the Save button to save all the changes you’ve made!
That’s a wrap for today’s tutorial! By now, you should be able to create collections, informational store pages, legal policies, and different menus containing these links. You’ve also learned how to display them on your storefront.
If you have any questions or run into any issues, feel free to leave a comment below. Our team is here to help and will do their best to resolve any concerns and answer your questions!

